

Do you want to reinstall Windows 7 on your computer that currently has Windows 10 or Windows 8/8.1? Do you want to know how to use the Windows Boot Manager , the tool that lets you choose which operating system to boot from? You've come to the right place! In this article, we'll explain what the Windows Boot Manager is, how to enable and disable it, how to boot from a USB drive, and how to install Windows 7 in UEFI mode. Follow the guide!
Windows Boot Manager: what is it?

The Windows Boot Manager is a program that loads when the computer starts and displays a menu with the different operating systems installed on the hard drive or external media. This allows the user to choose the system they want to boot. The Windows Boot Manager is present on computers that use UEFI firmware , a newer technology that replaces the traditional BIOS. UEFI firmware offers more features and security than BIOS, including the ability to boot from disks larger than 2 TB, manage multiple primary partitions, and protect the boot process against malware.
How to enable and disable the Windows Boot Manager in Windows 10?
If you have multiple operating systems installed on your computer, you can enable or disable the Windows Boot Manager to show or hide it at startup. There are two ways to do this: via the command prompt or through system properties.
Method 1: Enabling and disabling the Windows Boot Manager via the command prompt
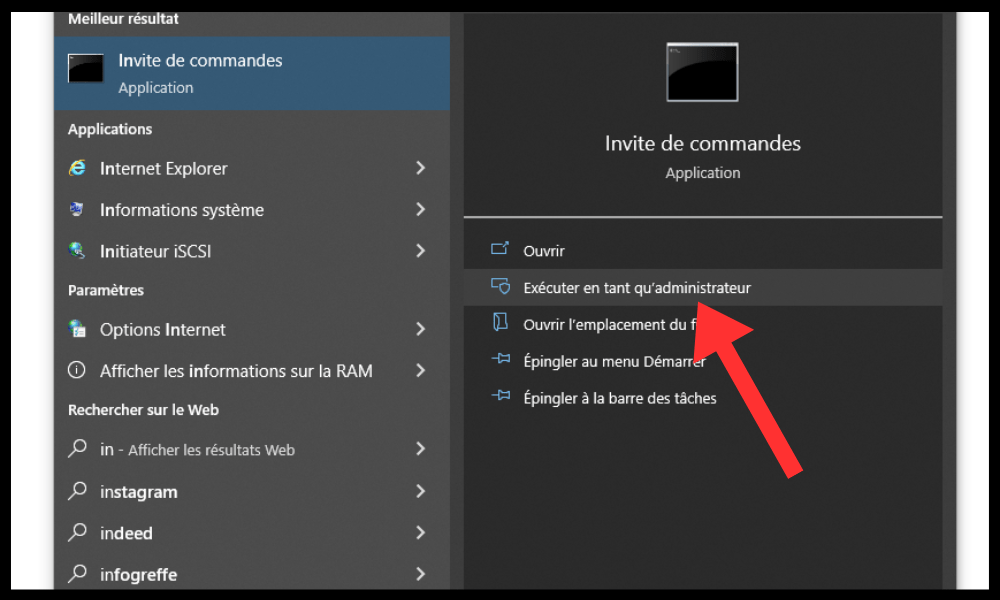
- Open the command prompt as an administrator. To do this, right-click on the Start menu and choose Command Prompt (admin) .
- Type the following command to display the startup menu entries:
bcdedit
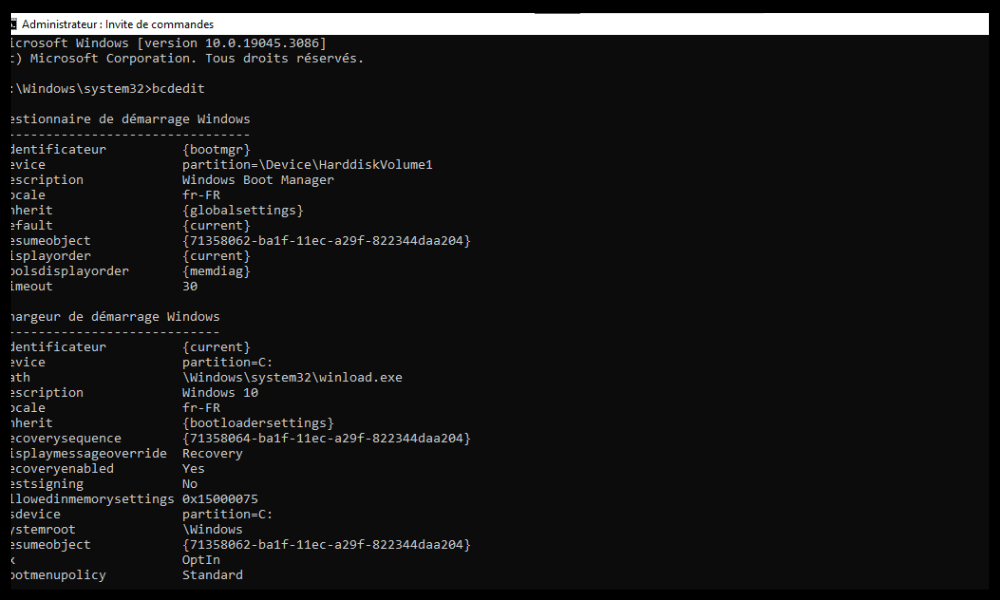
- Windows Boot Manager entry and note its identifier between curly braces. For example:
Windows Boot Manager ------------------- identify {bootmgr}

- To activate the Windows Boot Manager, type the following command, replacing the identifier with the one you noted:
bcdedit /set {bootmgr} displaybootmenu yes
- To disable the Windows Boot Manager, type the following command, replacing the identifier with the one you noted:
bcdedit /set {bootmgr} displaybootmenu no
- Restart your computer to apply the changes.
Method 2: Enable and disable the Windows Boot Manager via system properties
- Open system properties. To do this, right-click the Start menu and choose System . Then click Advanced system settings in the left pane.

- On the Start , click the Settings .
- Check or uncheck the " Show the list of operating systems for" and set the menu display duration in seconds.

- Click OK to confirm the changes.
How to boot from a USB drive in Windows 8/10?
If you want to reinstall Windows 7 on your computer, which is currently running Windows 10 or Windows 8/8.1, you need to create a bootable USB drive (or flash drive) containing the Windows 7 ISO image. You then need to change the BIOS setting so that the system boots from the USB drive. Here are the steps to follow:
Step 1: Create a bootable Windows 7 USB drive

- Download the Windows 7 ISO image from the official Microsoft website. You will need to enter your Windows 7 product key to download it.
- Rufus software , which allows you to create bootable USB drives.
- Connect your USB drive to your computer and launch Rufus.
- Select your USB drive from the Device .
- Click the SELECT Windows ISO image you downloaded.
- Verify that the Partition Type is set to MBR and that the Destination System is set to BIOS or UEFI .
- Click the START to begin creating the bootable USB drive.
Step 2: Change the BIOS setting
- Restart your computer and press the F2 (or another key depending on your computer model) to enter the BIOS.
- Open the Boot and set the boot mode to Legacy Support . Also set USB Boot to Enabled .

- Press the F9 to load the default settings, then press the F10 to save and exit the BIOS.
Step 3: Boot from the USB drive
- Restart your computer and press the F12 (or another key depending on your computer model) to display the boot menu.
- Select your USB drive from the list of devices and press Enter.
- Follow the on-screen instructions to install Windows 7.
How to install Windows 7 in UEFI mode?
If you want to take advantage of UEFI firmware, you can install Windows 7 in UEFI mode. To do this, you need to create a bootable Windows 7 USB drive in UEFI mode and change the BIOS setting so that the system boots in UEFI mode. Here are the steps to follow:
Step 1: Create a bootable Windows 7 USB drive in UEFI mode
- Download the Windows 7 ISO image from the official Microsoft website. You will need to enter your Windows 7 product key to download it.
- Rufus software , which allows you to create bootable USB drives.
- Connect your USB drive to your computer and launch Rufus.
- Select your USB drive from the Device .
- Click the SELECT Windows ISO image you downloaded.
- Verify that the Partition Type is set to GPT and that the Destination System is set to UEFI (not CSM) .
- Click the START to begin creating the bootable USB drive.
Step 2: Change the BIOS setting
- Restart your computer and press the F2 (or another key depending on your computer model) to enter the BIOS.
- Open the Boot menu and set the boot mode to UEFI Only. Also set Secure Boot to Disabled .

- Press the F9 to load the default settings, then press the F10 to save and exit the BIOS.
Step 3: Boot from the USB drive
- Restart your computer and press the F12 (or another key depending on your computer model) to display the boot menu.
- Select your USB drive from the list of devices and press Enter.
- Follow the on-screen instructions to install Windows 7 in UEFI mode. Note that you must choose a GPT partition to install Windows 7 in UEFI mode. If you do not have a GPT partition, you must delete all existing partitions and create a new GPT partition.
FAQ
What is the difference between BIOS and UEFI?
BIOS is the older technology used to manage computer startup. UEFI is the newer technology that replaces BIOS and offers more features and security.
What is the difference between MBR and GPT?
MBR and GPT are hard drive partitioning formats. MBR is the older format, which limits disk size to 2 TB and the number of primary partitions to 4. GPT is the newer format, which allows for disks larger than 2 TB and the creation of as many primary partitions as needed.
How can I tell if my computer uses BIOS or UEFI?
your motherboard's firmware settings and browsing the menus for the term " UEFI ." If you find it, your motherboard definitely has UEFI firmware Windows Disk Management and checking if your hard drive is formatted as MBR or GPT. If it's MBR, your computer uses BIOS . If it's GPT, your computer uses UEFI.
How do I change my computer's startup mode?
To change your computer's boot mode, you need to enter the BIOS and modify the boot mode setting. You can choose between Legacy Support to boot in BIOS mode or UEFI Only to boot in UEFI mode.
How do I create a bootable USB drive?
To create a bootable USB drive , you need to download the ISO image of the operating system you want to install and use software like Rufus to copy the ISO image to your USB drive . You also need to choose the partition type and the destination system according to the boot method you want to use.
Conclusion
You now know how to use the Windows Boot Manager on Windows 7/8/10. This tool allows you to choose which operating system to boot from if you have multiple systems installed on your computer. You can enable or disable the Windows Boot Manager as needed. You can also boot from a USB drive to reinstall Windows 7 on your computer , which may be running Windows 10 or Windows 8/8.1. Before starting the installation, you must ensure that the USB drive is detected by your computer. To do this, you can use the "Checking media presence" function, which appears in the BIOS or UEFI menu at startup . You can choose between installing Windows 7 in BIOS mode or UEFI mode , depending on the advantages and disadvantages of each. We hope this article has been helpful and that you have successfully used the Windows Boot Manager.
 to use the Ping command in Windows ?")

