
")
Do you use Google Photos to back up and share your photos and videos, but you're running out of storage space? Don't panic, there are simple and effective solutions to optimize your use of this service . In this article, we'll show you six methods to free up storage space on Google Photos without losing your memories.
Method 1: Manage your Google account storage space
The first method involves managing the storage space of your Google account , which is shared with other Google services, such as Gmail and Drive . Indeed, the emails, files, and photos you store on these services take up space in your Google account.
It is therefore important to sort through your belongings regularly , to remove items that you no longer need or that are too large.
To access the storage management , you can click on this link: one.google.com/storage/management
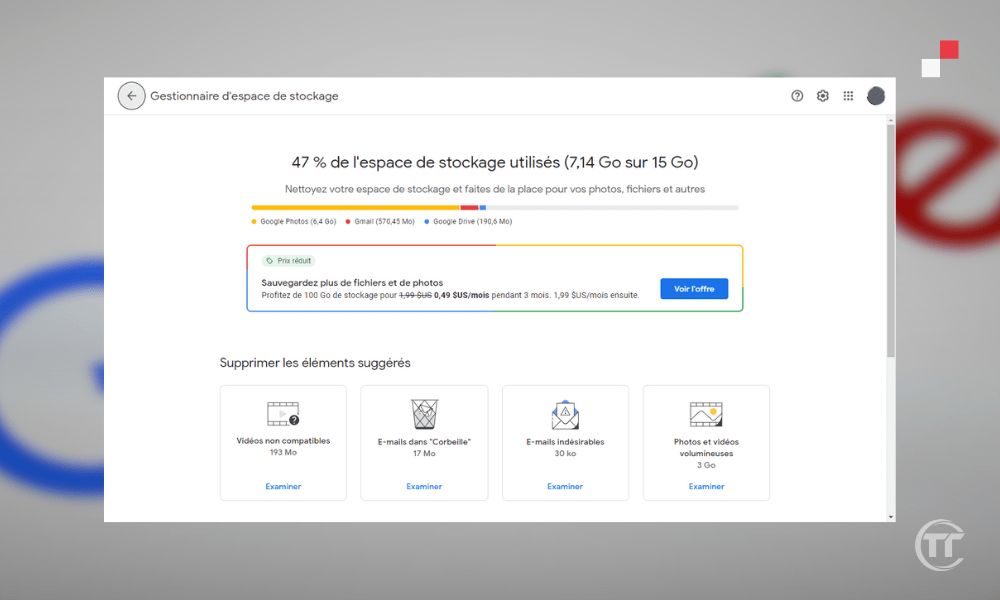
You will then see this graph showing how your storage space is distributed across different Google services . You will also be able to see options for freeing up space, such as:
- deleted, junk, large, or attachment-based emails
- deleted, large, or unused files
- Delete photos and videos in original quality in Google Photos
Method 2: Free up space on your device with Google Photos
The second method involves freeing up space on your device using Google Photos . When you back up your photos and videos to the cloud , they also remain on your device unless you manually delete them. This can take up a significant amount of space on your smartphone or tablet's internal memory or SD card.
Fortunately, Google Photos offers a very handy feature to free up space on your device by deleting photos and videos already backed up to the cloud.
To do this, simply open the Google Photos , tap the three horizontal bars in the top left corner, and then tap “ Free up space ”. You will then see the number of photos and videos you can delete from your device without losing them in the cloud.

Please note that photos and videos less than 30 days old are kept on the device to give you time to view or edit them. If you agree, click “ Delete ” and you're done!
Method 3: Compress high-quality photos and videos
The third method involves compressing photos and videos in high quality. Indeed, Google Photos offers two quality options for saving your photos and videos: original or high quality .
- Original quality corresponds to your device's maximum resolution, without any compression. It's ideal for professional photographers or discerning amateurs who want to preserve the optimal quality of their photos. However, it has one drawback: it counts against your Google account storage space.
- High quality refers to a light compression of your photos and videos, reducing their size without altering their visual appearance. It's suitable for most users who want to enjoy Google Photos without worrying about storage space. In fact, high quality is free and unlimited, meaning you can save as many photos and videos as you want, without ever exceeding the 15 GB limit of your Google account.
To compress your photos and videos in high quality, you need to access the Google Photos settings by clicking on the three horizontal bars or on your profile picture in the top left corner, then on “ Settings ”. Next, click on “ Backup and sync ”, then on “ Upload size ” or “ Backup quality ”.
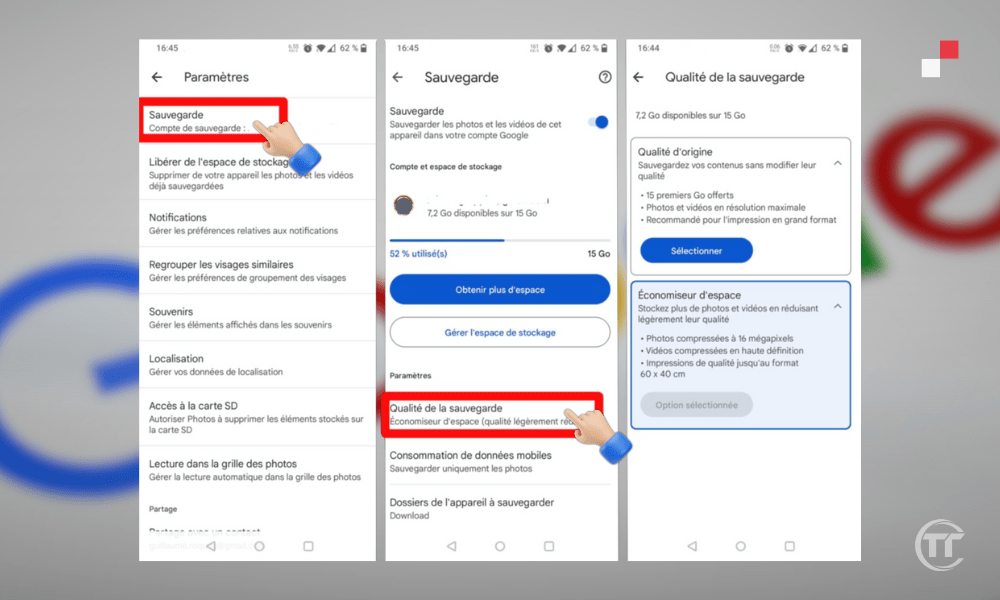
If you want to switch from original quality to high quality, click on “ High quality ” (free and unlimited), then on “ Confirm ”. You will then see a message informing you that your original quality photos and videos will be compressed to high quality, and that the storage space they occupied will be freed up . Click on “ Compress ” and wait for the process to complete.
Good to know : How to create a secondary email address on Gmail?
Method 4: Delete duplicate or unwanted photos and videos
The fourth method involves deleting duplicate or unwanted photos and videos . Google Photos can sometimes save duplicate or unwanted photos and videos, such as screenshots, failed selfies, documents, etc. These items take up unnecessary space and can disrupt the organization of your library.
It is therefore advisable to delete them manually or with third-party applications .
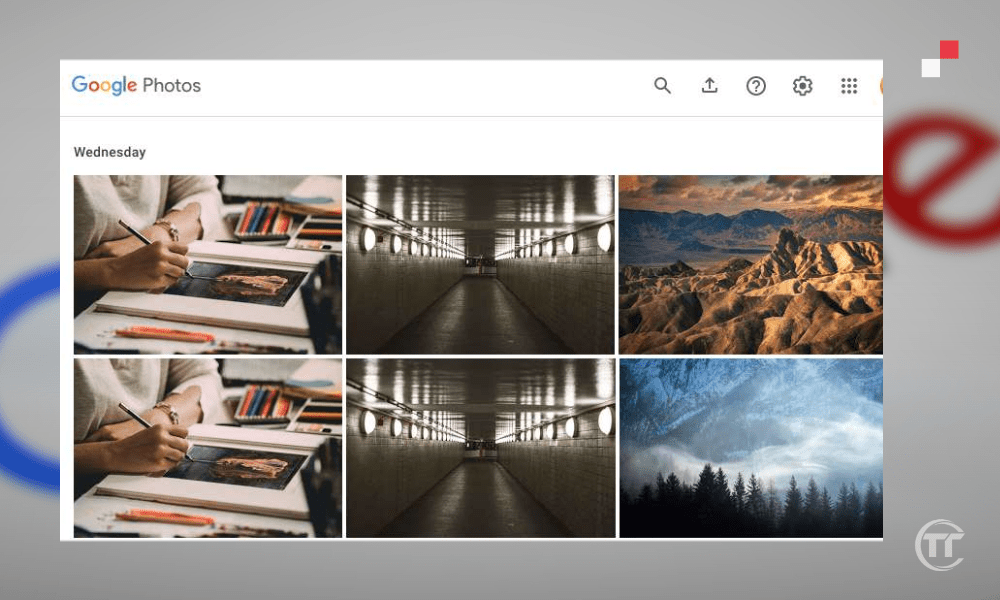
To manually delete duplicate or unwanted photos and videos, you need to open the Google Photos , then click on the search icon in the bottom right corner. You will then see different categories of photos and videos, such as “ People & Pets ”, “ Places ”, “ Things ”, etc.
You can explore these categories to find the items you want to delete by selecting them with a long press and then clicking the trash can icon in the top right corner. You can also use the search bar to type keywords, such as “ screenshot ,” “ document ,” “ blurry ,” etc.
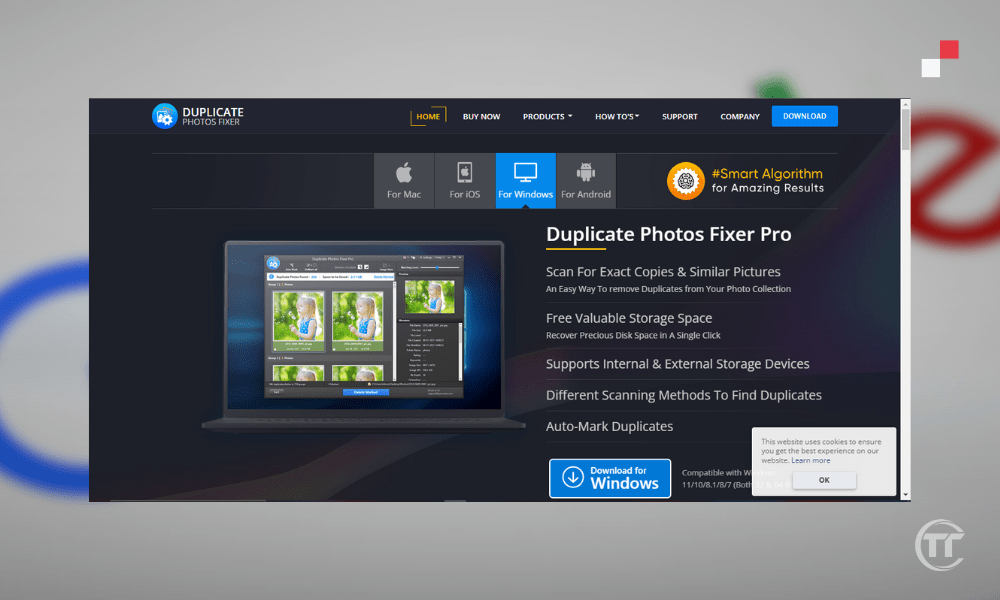
To remove duplicate or unwanted photos and videos using third-party applications, you can use apps like Duplicate Photos Fixer , Remo Duplicate Photos Remover , etc. These apps scan your Google Photos library and offer to remove duplicate, blurry, dark, similar, and other types of photos and videos.
Method 5: Archive less important photos and videos
The fifth method involves archiving less important photos and videos . Indeed, Google Photos allows you to archive less important photos and videos, such as receipts, invoices, ID cards, etc.
These items don't necessarily need to be deleted, but they also shouldn't be displayed in the main Google Photos view, which is meant to showcase your best memories. By archiving them , you remove them from the main view, but you keep them in a dedicated section, accessible at any time.
To archive less important photos and videos, open the Google Photos , then select the items you want to archive with a long press . Next, tap the archive icon in the top right corner. You will then see a message confirming that the selected items have been archived.

To view your archived photos and videos, simply go to the “ Archive ” menu. You will then see all the items you have archived, sorted by date. You can restore them to the main view by selecting them and then clicking the arrow icon in the upper right corner.
Method 6: Subscribe to a Google One subscription
The sixth and final method is to subscribe to Google One . Google One is Google's paid subscription service to increase your storage space on Google Photos, Gmail, and Drive.
If you need more than 15 GB of storage space , or if you want to keep your photos and videos in their original quality, Google One could be a good option. Google One offers different plans and benefits, depending on your needs and budget.
For example, you can obtain:
- 100GB of storage space for €1.99 per month or €19.99 per year
- 200 GB of storage space for €2.99 per month or €29.99 per year
- 2TB of storage space for €9.99 per month or €99.99 per year
- Etc.
In addition to extra storage space, Google One also offers you:
- The ability to share your storage space with up to 5 family
- Access to Google experts to help you if you have a problem
- Exclusive benefits , such as discounts on the Google Store, Google Play credits, etc.
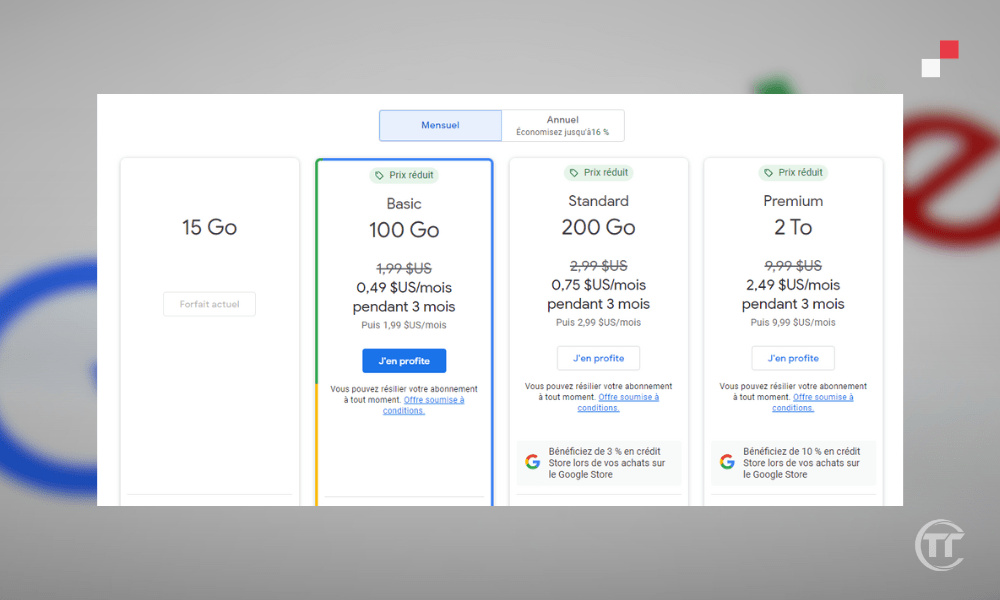
To subscribe to Google One, click on this link: one.google.com . You will then see the different offers available, along with their prices and benefits. You can choose the one that suits you best by clicking on “ Subscribe ”. You will then need to enter your payment information and confirm your subscription.
Translate text, search for products and other features using your camera : How to use Google Lens to analyze and identify any images?
FAQ
What is the difference between Google Photos and Google Drive?
These are two online storage services from Google, but they have different features.
- Google Photos specializes in storing and sharing photos and videos
- Google Drive is more general and allows you to store and synchronize all types of files, such as documents, spreadsheets, presentations, etc.
Google Photos and Google Drive 15GB of free storage space
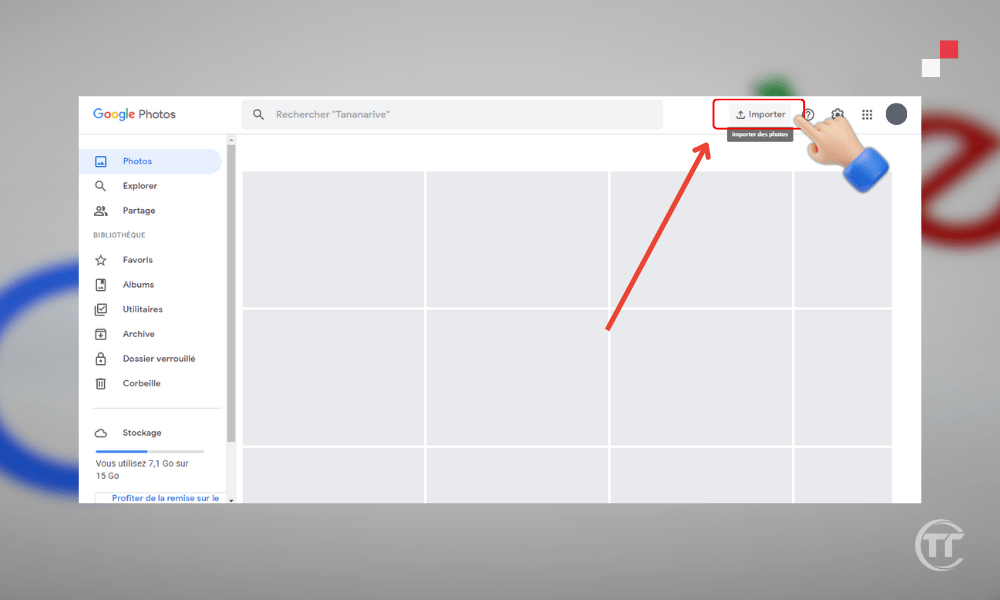
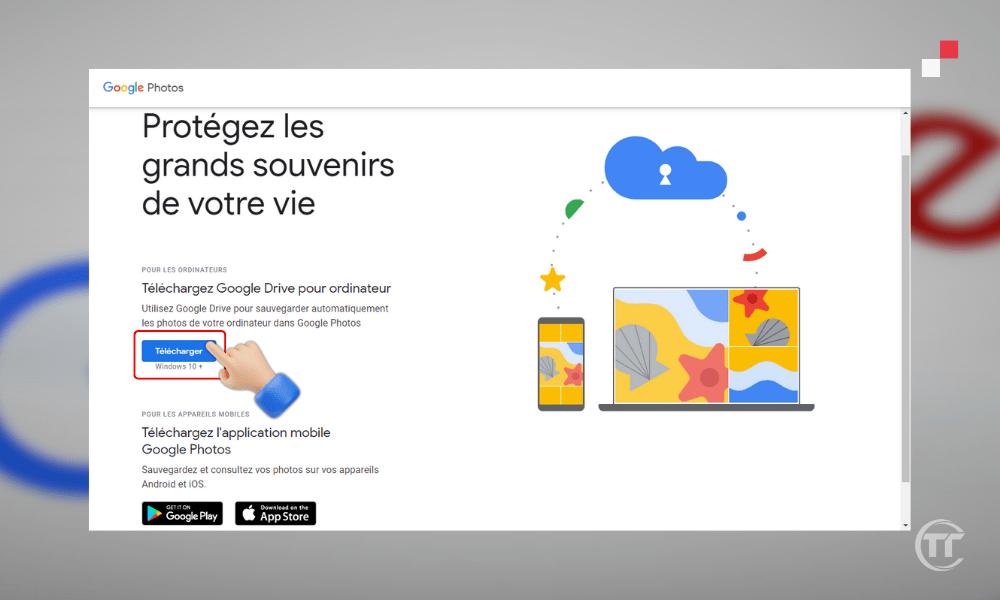
How do I back up my photos to Google Photos from my computer?
To back up your photos to Google Photos from your computer , there are two methods:
- The first method involves using the website by going to photos.google.com . Then, simply click the " Upload " button in the top right corner of your screen. You can then select the photos or folders you want to import and choose the backup quality (original or high quality).
- The second method involves using the Backup and Sync app, available for Windows and Mac. First, download and install the app photos.google.com. sign in with your Google account . You can then choose which folders you want to sync with Google Photos and the backup quality (original or high quality). The app will then automatically back up the photos and videos in the selected folders.
Q: How do I back up my photos to Google Photos from my smartphone or tablet?
To back up your photos to Google Photos from your smartphone or tablet, you need to use the Google Photos , available for Android and iOS . First, download and install the app, then sign in with your Google account.
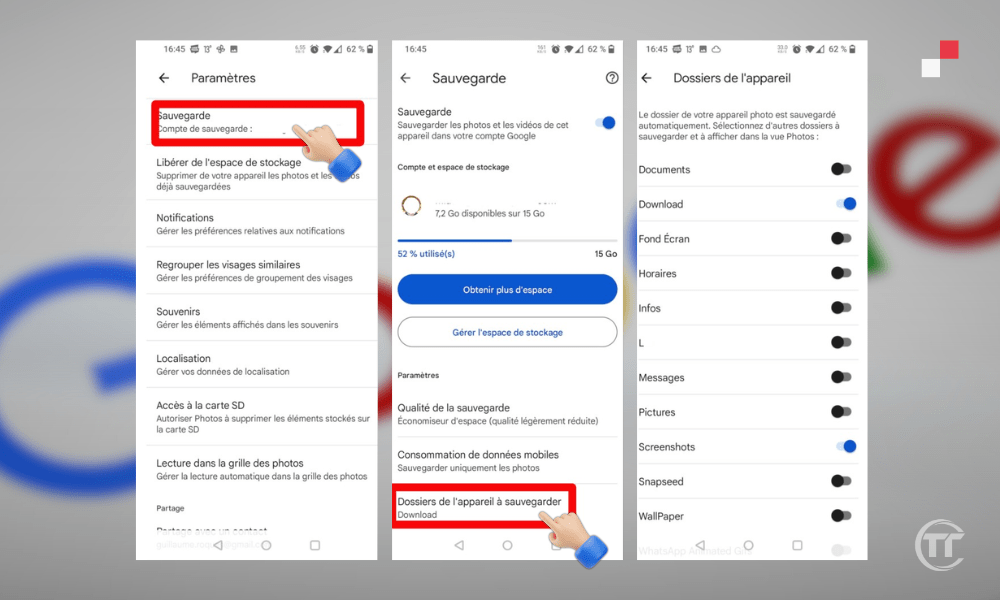
You can then activate the “ Backup and Sync ” feature, which allows you to automatically back up photos and videos taken with the device, or stored in the gallery. You can also choose the backup quality (original or high quality) and the connection options (Wi-Fi or mobile data).
How do I share my photos on Google Photos with my contacts?
To share your photos on Google Photos with your contacts, there are several options:
- The first possibility is to create a shared albumThis allows you to invite people to view and add photos and videos to a shared album. To do this:
- Google Photos app , then click on the share icon in the bottom left corner.
- You can then create a new album , or choose an existing one , and then add the photos and videos you want to share.
- Next, you need to click on “ Share ”, then choose the people with whom you want to share the album, either from your Google contacts, or by sending a link.
- Invited guests will then be able to view and add photos and videos to the album, and comment on the items.
- The second possibility consists of to send photos and videos directly to his contacts, without creating an album. To do this:
- You need to open the Google Photos , then select the photos and videos you want to send, with a long press.
- Next, you need to click on the share icon in the top right corner, then choose the people with whom you want to share the photos and videos, either from your Google contacts, or by sending a link.
- The recipients will then be able to view and download the photos and videos, and add to their Google Photos library.
How to create a video montage with Google Photos?
To create a video montage Google Photos app , available for Android and iOS.
- First, open the application, then click on the “ + ” button in the top right corner, then on “ Movie ”.
- You can then choose a theme for your montage, such as “ Memories ”, “ Selfies ”, “ Animals ”, etc.
- The application will then automatically create a montage , with photos and videos corresponding to the theme, and suitable music.
- You can also create a custom montage , by selecting the photos and videos you want to include, and choosing the music, transitions, filters, etc.
- Once the editing is complete , you can save to your Google Photos library and share it with your contacts.


