

Dust, pet hair, human hair, food scraps, insects… Without regular maintenance, your computer equipment can really become a mess. In this article, we'll see how to deep clean your gaming keyboard to make it look like new again. This tutorial works just as well for membrane keyboards. There are many ways to perform this task; today I'll show you the most economical method!
Here's a short video on how to clean your mechanical gaming keyboard !
How long might the cleaning take?
Obviously, cleaning time can vary greatly depending on your skill level; however, allow between one and one and a half hours for a thorough job. As you'll see later, the most time-consuming part is cleaning the keys one by one. If you're short on time, this step can be skipped, but it's a shame!
Essential items
To properly clean your mechanical gaming keyboard, it's recommended to have a few supplies:
• A keycap puller to easily remove the keys from your keyboard (not mandatory)
• Cotton swabs
• Makeup remover or a similar product, water, and a bowl (for mixing)
• Paper towels, toilet paper, or tissues
• A vacuum cleaner
Here's the complete kit to clean your mechanical keyboard like a pro!

Remove and clean your keys
Remove them
To begin, you'll need to remove all your keycaps. I won't lie to you, if you don't have a keycap puller, removing the first few won't be easy. A small one usually costs less than 5 euros, so if you don't want the hassle, you know what to do!
Remove your keycaps with the keycap puller. Paradoxically, once a few keys are removed, it's quicker to remove the rest directly with your fingers.
Now that you've removed all your keys, you can see the mess… If, like me, you only clean it every few months, or even if you've never cleaned it at all, you'll think twice before eating in front of your computer.
Wash them
To clean them, you'll first need to soak them in water. A bucket or sink will do just fine. Then, you can lay them out on paper towels to dry.
Now it's time to prepare your cleaning solution! I use makeup remover, but you can use a similar product, like a cleaning product. Mix ¼ makeup remover and ¾ water in your bowl. Then stir.
Now comes the longest and most tedious part: if you want a clean job, you'll need to use paper towels and cotton swabs to clean each key individually. You can also soak them in the solution, but the letters might disappear! Once you've done this, rinse your keys and dry them again on paper towels.
Cleaning the keyboard
First, we'll remove the bulk of it. Shake your keyboard over a sink, a trash can, or the toilet. You can also do this over a blank sheet of paper and admire everything your keyboard can collect! The goal is to remove the largest unwanted pieces.
Between your keys
After that, using cotton swabs, collect anything that hasn't fallen off, usually dust and hair.
While you're doing this, use your other hand to vacuum just above to pick up what the cotton swabs loosen but don't collect.
Once this is done, only a few dust particles should remain. Using a moistened cotton swab, pick up any remaining small particles.
Apart from your keys
For the parts not between your keys (the visible part of your mechanical keyboard when it's not disassembled), simply use a paper towel dampened with the previously prepared solution. Once this is done, wipe everything with a dry paper towel.
Vacuum again to remove any remaining residue.
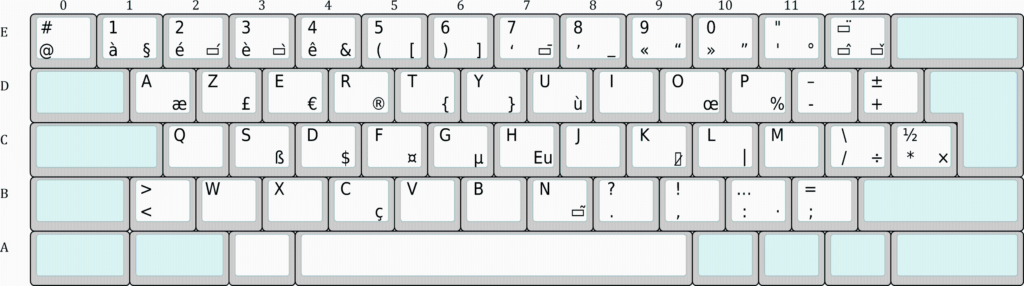
You can now reposition your keys! For those who don't remember their exact positions, you can refer to this image:
Some advice and contraindications
- If you use a lot of liquid, make sure everything is completely dry before reconnecting your device.
- No need to put your vacuum cleaner on full blast or blow hard, nor to hit it like a maniac to make crumbs fall, apart from damaging your keyboard you won't get anything out of it.
- There are specialized products to replace the mixture of makeup remover and water; if you can afford it, you can buy them almost anywhere on the internet.
Conclusion
As we've seen, cleaning your mechanical gaming keyboard isn't very complicated, but it does require care and time. This task should be done approximately every six months to keep your equipment in good condition. While you're at it, clean your mouse too!


 on a Mac?")