

Have you ever been frustrated by constantly searching for your Gmail inbox while working on your Windows PC? Search no further! In this article, we'll show you how to pin Gmail to your computer's taskbar for quick and easy access.
Step 1: Open Gmail in your preferred browser
To begin, open your Gmail inbox in your preferred web browser (Google Chrome, Mozilla Firefox, Microsoft Edge, etc.). You can access Gmail by typing "gmail.com" in your browser's address bar or by performing a quick search on your favorite search engine.

Step 2: Create a shortcut for Gmail
Once you've opened Gmail, it's time to create a shortcut for the application. Follow the steps below depending on the browser you're using:
Google Chrome
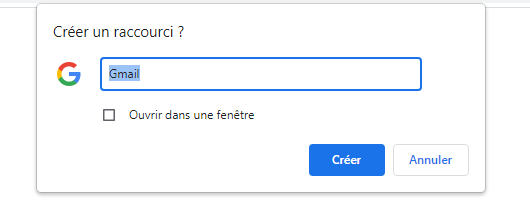
- Click on the three vertical dots in the top right corner of the browser window to open the menu.
- Place the cursor over "More tools", then click on "Create shortcut".

- Enter a name for your shortcut, for example "Gmail", then click "Create".
Microsoft Edge
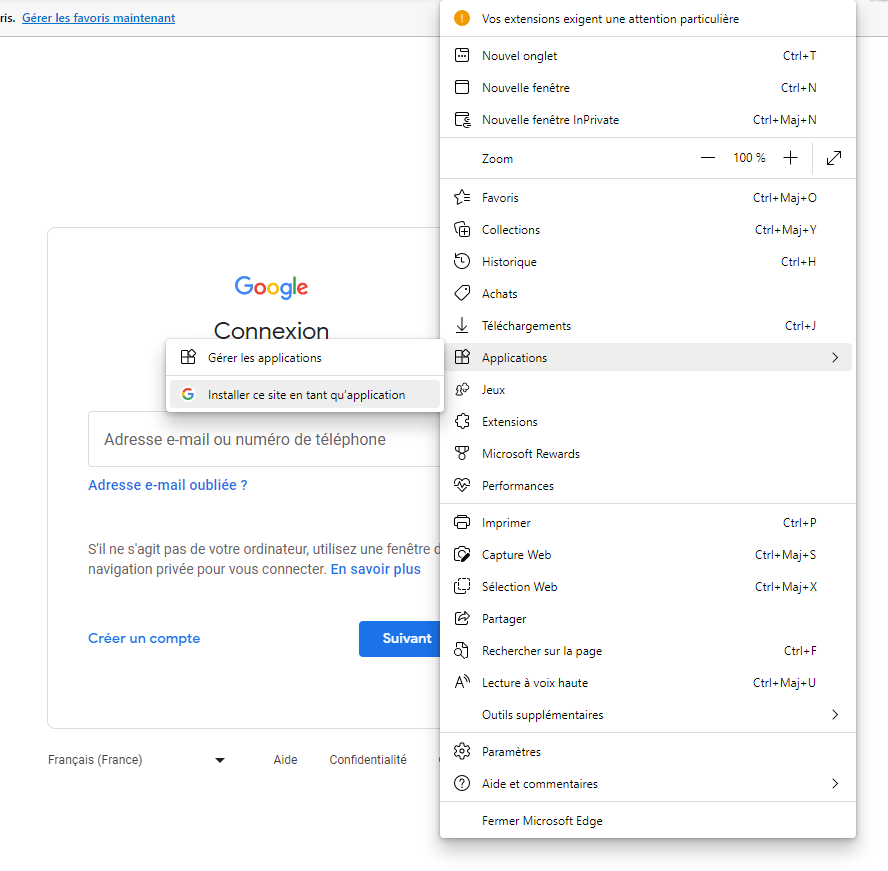
- Click on the three horizontal dots in the top right corner of the browser window to open the menu.
- Select "Applications", then click "Install this site as an application".
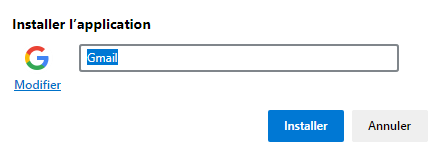
- Enter a name for your shortcut, for example "Gmail", then click "Install".
Mozilla Firefox
For Mozilla Firefox, you will need to create a shortcut manually:
- Right-click on your desktop, then choose "New" and "Shortcut".

- In the dialog box that opens, enter the address " https://mail.google.com/ " and click "Next".
- Enter a name for your shortcut, for example "Gmail", then click "Finish".

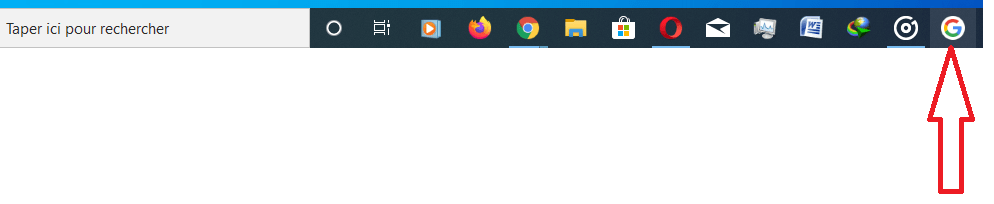
Step 3: Pin Gmail to the taskbar
Now that you've created a shortcut for Gmail, all you have to do is pin it to PC's taskbar Windows. Here's how:
- Right-click on the shortcut you just created (it should be on your desktop).
- Select "Pin to taskbar" from the context menu.

And there you have it! Gmail is now pinned to your WindowsPC's taskbar. You can click the Gmail icon in the taskbar for quick and easy access to your inbox, without having to open your browser and search for the application.
Here are some tips to secure your Gmail inbox
Comparative table of browsers
Here is a simple comparison table of the browsers mentioned above, without using CSS:
| Browser | Benefits | Disadvantages |
|---|---|---|
| Google Chrome | Tight integration with Google services, numerous extensions available | High resource usage, confidentiality |
| Microsoft Edge | Good performance, integration with Windows 10 | Fewer extensions available, user experience lagging behind Chrome |
| Mozilla Firefox | Respect for privacy, advanced personalization | Slightly lower performance than Chrome and Edge, less integration with Google services |
By following the steps outlined in this article, you have now learned how to pin Gmail to your WindowsPC's taskbar, regardless of your preferred browser. This simple trick allows you to access your emails more quickly and improve your daily productivity.
Disconnect your Gmail account remotely to protect your privacy
FAQ
How do I add a Gmail account to the Windows 10 Mail app?
To add a Gmail account to the Windows 10 Mail app, follow the steps below:
- Open the Mail app on your Windows 10 PC.
- Click on the gear icon in the bottom left corner to open the settings.
- Select "Manage accounts", then click "Add an account".
- Choose "Google" from the list of email providers.
- Enter your Gmail email address and password, then follow the on-screen instructions to complete adding your account.
Once you have added your Gmail account, you can manage your emails directly from the Windows 10 Mail app.
How do I configure Gmail notifications on my Windows PC?
To configure Gmail notifications on your WindowsPC, follow these steps:
- Open Gmail in your preferred web browser.
- Click on the gear icon in the top right corner, then select "View all settings".
- Go to the "General" tab and scroll down to the "Desktop Notifications" section.
- Activate notifications by choosing "New messages" or "Important only" according to your preferences.
- Click on "Save changes" at the bottom of the page to apply your settings.
You will now receive notifications on your desktop when you receive new or important emails.
Is it possible to use Gmail offline on a Windows PC?
Yes, it is possible to use Gmail offline on a WindowsPC. To enable Gmail offline functionality, follow these steps:
- Open Gmail in Google Chrome (this feature is only available in this browser).
- Click on the gear icon in the top right corner, then select "View all settings".
- Go to the "Offline" tab and check the "Enable offline messaging" box.
- Choose your sync and storage preferences, then click "Save changes".
After enabling this feature, you'll be able to access, read, and reply to your emails even when you're not connected to the internet. Gmail will automatically sync your changes when you reconnect.
How to organize and manage labels in Gmail on a Windows computer?
Labels allow you to categorize and organize your emails in Gmail. To manage labels on a Windowscomputer, follow these steps:
- Open Gmail in your web browser.
- Click on the gear icon in the top right corner, then select "View all settings".
- Access the "Labels" tab to view the list of your existing labels.
- You can create new labels, edit or delete existing labels, and determine their visibility in the label list.
- Use the "Create a new label" button to add new labels to your list.
Once your labels are created and organized, you can assign them to your emails to categorize and find them more easily.
How do I archive or delete emails in Gmail on my Windows PC?
To archive or delete emails in Gmail on your WindowsPC, follow these instructions:
- Open Gmail in your web browser.
- Select the emails you want to archive or delete by checking the boxes next to each message.
- To archive the selected emails, click on the icon representing a box with a downward arrow located at the top of the message list.
- To delete the selected emails, click on the trash can icon located at the top of the message list.
Archived emails will be moved to the "All Mail" section of Gmail, while deleted emails will be moved to the trash and permanently deleted after 30 days.
How do I create custom signatures for Gmail on my Windows computer?
To create a custom signature in Gmail on your Windowscomputer, follow these steps:
- Open Gmail in your web browser.
- Click on the gear icon in the top right corner, then select "View all settings".
- Go to the "General" tab and scroll down to the "Signature" section.
- Click on "Create a new signature", enter a name for your signature, then click on "Create".
- Compose your signature using the available formatting options, then click "Save changes" at the bottom of the page to save your signature.
Your personalized signature will be automatically added to all emails you send from Gmail.
Conclusion
This FAQ covers various aspects of using Gmail on a Windowscomputer, including adding a Gmail account to the Windows 10 Mail app, setting up notifications, using Gmail offline, managing labels, archiving and deleting emails, and creating custom signatures. By mastering these features and tips, you can take full advantage of Gmail to effectively manage your email and improve your daily productivity.


