

Tired of seeing theE_FAIL (0x80004005) error every time you try to launch VirtualBox on Windows ? Don't worry, we have the solution! In this guide, we offer an overview of the different methods to resolve this problem and allow you to fully enjoy virtualization. Whether you're a novice or an expert in IT, we've simplified the technical terms so that everyone can understand and apply the proposed solutions.
Understanding the E_FAIL error (0x80004005)

Before we delve into the solutions, it's essential to understand what the E_FAIL (0x80004005) error. This error typically occurs when opening a virtual machine in VirtualBox, an open-source virtualization software developed by Oracle. The error indicates that VirtualBox encountered a problem while performing an operation and failed to complete it.
Possible causes of the error
- Compatibility issue between VirtualBox and your Windows operating system
- Problem with your computer's drivers or virtualization software
- Problem with VirtualBox settings or virtual machine configuration files
Solutions to resolve error E_FAIL (0x80004005)
1. Update VirtualBox and your system drivers
The first step to resolve the E_FAIL (0x80004005) error is to verify that you have the latest version of VirtualBox and that your system drivers are up to date. To update VirtualBox, go to the official website operating system Windows. To update your drivers, use the Windows or a specialized third-party software.
This article might interest you: How to fix the err_cache_miss error in Google Chrome?
2. Reset VirtualBox settings
Another solution to resolve the E_FAIL (0x80004005) error is to reset the VirtualBox settings. To do this, follow these steps:
Step 1: Close VirtualBox
Step 2: Press the Windows Registry Editor Windows
Step 3: Navigate to "HKEY_CURRENT_USER\Software\Oracle\VirtualBox"
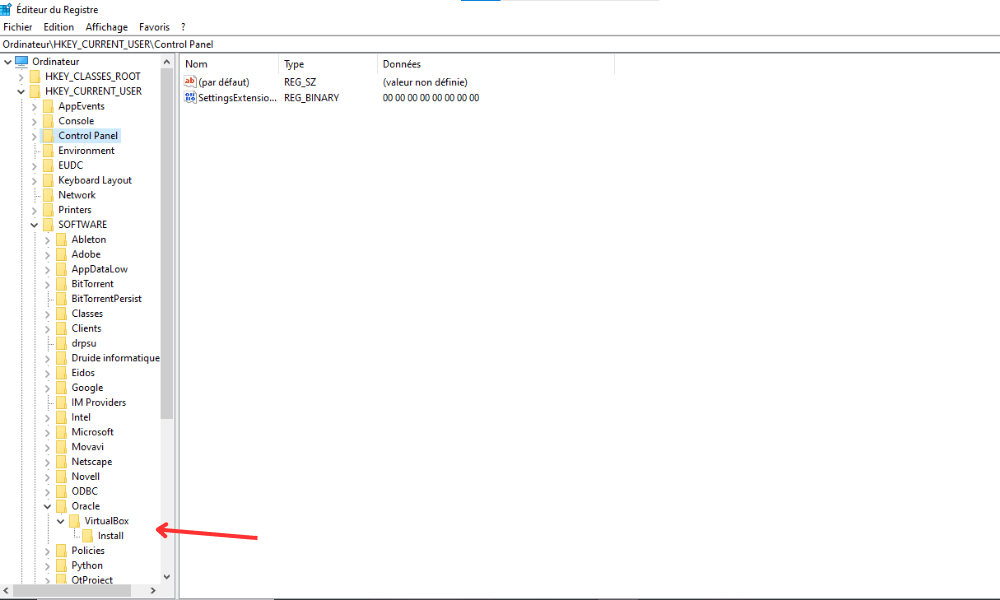
Step 4: Right-click on the "VirtualBox" folder and choose "Export" to create a backup of the current settings

Step 5: Delete the "VirtualBox" folder by right-clicking on it and selecting "Delete".

Step 6: Restart your computer and relaunch VirtualBox
Note that this method will reset all VirtualBox settings, so you will need to reconfigure them according to your needs.
3. Disable hardware acceleration
Sometimes, hardware acceleration can cause the E_FAIL (0x80004005) error in VirtualBox. To disable this feature, follow these steps:
Step 1: Open VirtualBox and select the relevant virtual machine

Step 2: Click on "Configuration" then on the "System" tab
Step 3: In the "Acceleration" tab, uncheck the "Enable VT-x/AMD-V" box.
Step 4: Apply the changes and try to start the virtual machine

4. Repair the virtual machine configuration files
The virtual machine configuration files may be corrupted or misconfigured, resulting in the E_FAIL (0x80004005) error. To repair them, follow these steps:
Step 1: Close VirtualBox
Step 2: File Explorer Windows and navigate to the folder containing the virtual machine configuration files (usually "C:\Users\[Your username]\VirtualBox VMs\[Virtual machine name]")
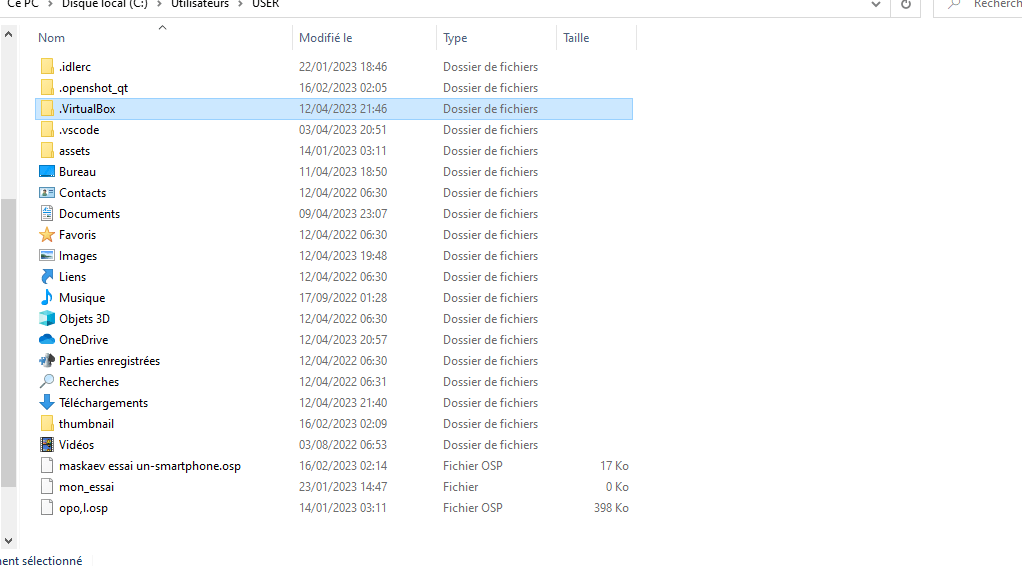
Step 3: Locate the ".vbox" file corresponding to the virtual machine and open it with a text editor (such as Notepad or Notepad++)
Step 4: Look for lines containing "", "", and "". If they are present, delete them and save the file.
Step 5: Restart VirtualBox and try to launch the virtual machine
Comparative table of solutions
| Solution | Benefits | Disadvantages |
|---|---|---|
| Update VirtualBox and system drivers | Ensures optimal compatibility and improved performance | May not solve the problem if the cause lies elsewhere |
| Repair the virtual machine configuration files | Resolves problems related to file corruption or misconfiguration | Does not apply if the configuration files are not the cause |
| Reset both VirtualBox settings | This allows you to resolve problems related to VirtualBox settings | Requires reconfiguration of all settings after the reset |
| Disable hardware acceleration | Resolves problems related to hardware acceleration | May lead to a decrease in virtual machine performance |
By following the methods described in this guide, you should be able to resolve the VirtualBox error E_FAIL (0x80004005) on Windows. Feel free to try different solutions and adapt the steps to suit your system and specific needs. Once the error is resolved, you will be able to fully enjoy the benefits of virtualization offered by VirtualBox.
FAQ
What is the difference between VirtualBox and other virtualization software like VMware or Hyper-V?
VirtualBox, VMware, and Hyper-V are popular virtualization software, but they have some differences:
- VirtualBox: Developed by Oracle, VirtualBox is a free and open-source virtualization software. It is compatible with many operating systems, including Windows, macOS, Linux, and Solaris. VirtualBox offers basic virtualization features and is well-suited for individual users and small businesses.
- VMware: Developed by VMware Inc., VMware offers several virtualization products, including VMware Workstation, VMware Fusion, and VMware vSphere. VMware provides advanced features and superior performance, but its products are often paid and primarily aimed at businesses and IT professionals.
- Hyper-V: Developed by Microsoft, Hyper-V is a virtualization software integrated into Windows Server and some editions of Windows 10. It is specifically designed for Microsoft environments and offers advanced features for managing and securing virtual machines. Hyper-V is primarily intended for businesses and IT professionals.
Depending on your needs and operating system, choose the virtualization software that best suits your situation.
How do I install VirtualBox on another operating system, such as macOS or Linux?
VirtualBox is compatible with many operating systems, including macOS and Linux. Here's how to install it on these platforms:
- macOS:
- Go to the official VirtualBox website (www.virtualbox.org) and download the latest version compatible with macOS.
- Open the downloaded DMG file and follow the on-screen instructions to install VirtualBox.
- Once the installation is complete, open VirtualBox from the Applications folder.
- Linux:
- Go to the official VirtualBox website and download the latest version compatible with your Linux distribution.
- Open a terminal and navigate to the folder where the file was downloaded.
- Install VirtualBox using the appropriate command for your distribution (for example, "sudo dpkg -i virtualbox-[version].deb" for Debian and Ubuntu, or "sudo rpm -ivh VirtualBox-[version].rpm" for Fedora and CentOS).
- Once the installation is complete, launch VirtualBox from the applications menu or by running the command "virtualbox" in a terminal.
How to create a virtual machine in VirtualBox from an ISO file?

Creating a virtual machine in VirtualBox from an ISO file is a simple process. Follow these steps:
- Open VirtualBox and click on "New" to create a new virtual machine.
- Enter a name for the virtual machine, choose the appropriate operating system and version, and then click "Next".
- Configure the amount of RAM to allocate to the virtual machine, then click "Next".
- Create a new virtual hard disk by selecting "Create a virtual hard disk now" and clicking "Create".
- Choose the virtual hard disk format (VDI, VHD or VMDK) and click "Next".
- Select the type of space allocation (dynamically allocated or fixed size) and click "Next".
- Configure the virtual hard drive size and storage location, then click "Create".
- Select the newly created virtual machine and click on "Configuration".
- Go to the "Storage" tab and select the empty disk icon under "Controller: IDE" or "Controller: SATA".
- Click on the disc-shaped icon on the right and choose "Choose a virtual optical disc".
- Browse your file system to locate the ISO file, select it, and click "Open".
- Click "OK" to save the changes, then start the virtual machine by clicking "Start".
The virtual machine will boot from the ISO file, and you will be able to proceed with the operating system installation.
What virtual hard disk formats are supported by VirtualBox?
VirtualBox supports several virtual hard disk formats, including:
- VDI (VirtualBox Disk Image): VirtualBox's native format, offering good performance and optimal compatibility with VirtualBox features.
- VHD (Virtual Hard Disk): format developed by Microsoft and used by Hyper-V, allowing some interoperability between VirtualBox and Microsoft virtualization solutions.
- VMDK (Virtual Machine Disk): format developed by VMware, enabling interoperability between VirtualBox and VMware products.
Choose the virtual hard disk format that best suits your needs based on compatibility and interoperability with other virtualization software.
Conclusion
This FAQ guide addresses several popular questions about VirtualBox, covering topics such as installation on different operating systems, creating virtual machines from ISO files, supported virtual hard disk formats, and the differences between VirtualBox and other virtualization software. The answers provided should help you better understand and use VirtualBox in your virtualization projects. Feel free to consult the official documentation and support forums for additional information and to resolve any issues you may encounter while using VirtualBox.
If, by chance, when opening a Windows, you encounter the message: “The application failed to start correctly (0xc000007b)”, consult this article!
 to use the Ping command in Windows ?")

