

The AppX Deployment Service is a process that manages the installation, removal, updates, and licensing of apps installed from the Windows Store . These apps are called Universal Windows Platform (UWP) apps and are distributed in .AppX packages . This process is essential for the proper functioning of Store apps, but it can sometimes cause performance issues on your PC.
What causes high CPU usage by the AppX deployment service?

Possible causes of high CPU by the AppX deployment service are:
- An app update is currently in progress for the Store
- A damaged or misconfigured app from the Store
- A problem with the Windows Store itself
- A virus or malware hiding behind the wsappx process
How to fix high CPU usage by the AppX deployment service?
There are several possible solutions to fix the high CPU usage by the AppX deployment service. Here are the steps to follow:
Step 1: Let the wsappx process finish its work
 The first thing to do is check if the wsappx process is updating a Store app. If so, simply wait until the update is complete, which should resolve the issue. You can check the update status by opening the Windows Store, clicking the three dots (…) in the top right corner, and then selecting “Downloads and updates”.
Step 2: Disable automatic updates from the Windows Store
If you don't want the wsappx process to run automatically to update Store apps, you can disable this option in the Windows Store settings. Here's how:
- Open the Windows Store
- Click on the “…” in the top right corner, then on “Settings”

- Turn off the “Automatically update apps” switch

This way, you can choose when and which applications to update manually.
Step 3: Reset the Windows Store
If the problem persists, the Windows Store may be damaged or corrupted. In this case, you can try resetting it by following these steps:
- Open the Start menu and type “wsreset.exe”
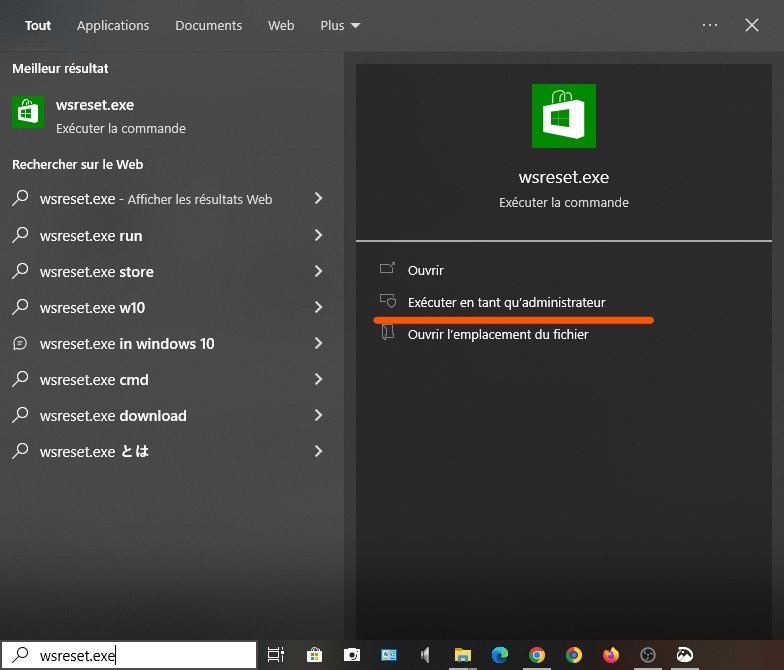
- Right-click on the “wsreset” application and choose “Run as administrator”
- Wait for the Windows Store window to open, then close it
This operation will clear the Windows Store cache and restore its default settings.
Step 4: Repair or reinstall the apps from the Store
If the problem stems from a corrupted or misconfigured app from the Store, you can try repairing or reinstalling it. Here's how:
- Open the Start menu and click on the “Settings” icon
- Click on “Applications”, then on “Applications and features”
- Find the problematic app from the Store in the list and click on it

- Click on “Advanced options”
- Click the “Repair” button to attempt to repair the application

- If that doesn't work, click the "Reset" button to reinstall the application
Warning: This operation will delete the application's data and settings.
Step 5: Scan your PC with an antivirus program
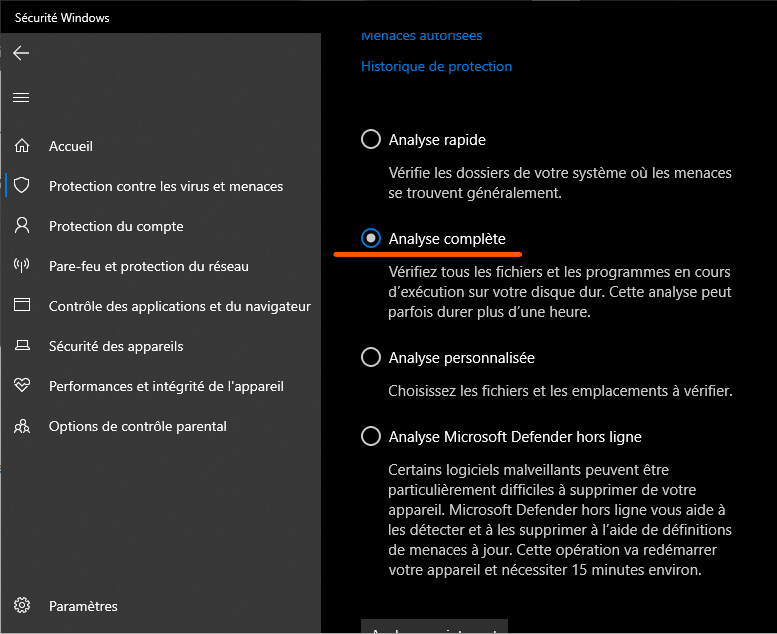
If none of the previous solutions work, your PC may be infected with a virus or malware hiding behind the wsappx process. In this case, you should scan your PC with up-to-date antivirus software and remove any detected threats. You can use the built-in Windows 10 antivirus, Windows Defender , or another antivirus program of your choice.
Comparative table of solutions
| Solution | Benefits | Disadvantages |
| Let the wsappx process finish its work | Simple and quick | Does not work if the wsappx process is blocked or corrupted |
| Disable automatic updates from the Windows Store | Allows you to control when and which applications to update | May cause security or compatibility issues if the applications are not up to date |
| Reset the Windows Store | Helps resolve issues related to the Windows Store | Clear the Windows Store cache and settings |
| Repair or reinstall apps from the Store | Helps resolve problems related to Store apps | Deletes application data and settings |
| Scan your PC with an antivirus program | It allows you to detect and remove viruses or malware | May take some time and requires up-to-date antivirus software |
FAQ
Is the wsappx process a virus?
No, the wsappx process is not a virus, but it can be impersonated by a virus or malware hiding behind its name. To check if this is the case, you should scan your PC with up-to-date antivirus software.
Why does the wsappx process use so much CPU?
The wsappx process uses a lot of CPU when it performs an update of a Store app, or when it encounters a problem with an app or with the Windows Store itself.
How do I disable the wsappx process?
Disabling the wsappx process is not recommended, as it is essential for the proper functioning of Store apps. If you still wish to disable it, you can try disabling automatic Windows Store updates, or using the Group Policy Editor or the Registry.
How do I properly disable the AppX deployment service?
If you don't want to use the Windows Store or the apps that depend on it, you can disable the AppX deployment service cleanly using the Group Policy Editor or the registry. Here's how:
- Open the Group Policy Editor by typing “gpedit.msc” in the Start menu
- Navigate to Computer Configuration > Administrative Templates > Windows Components > Store
- Double-click on the “Disable Store” strategy and choose “Enabled”
- Click OK and restart your PC
Or:
- Open the registry by typing “regedit” in the Start menu
- Navigate to HKEY_LOCAL_MACHINE\SOFTWARE\Policies\Microsoft\WindowsStore
- Create a new DWORD value named “RemoveWindowsStore” and give it the value 1
- Click OK and restart your PC
Warning: These operations will disable the Windows Store and all applications that depend on it. You will no longer be able to install or update them.
What is the difference between the AppX deployment service and the customer licensing service?
The AppX Deployment Service (AppXSVC) provides the infrastructure support for deploying Store applications. This service starts on demand. If it is disabled, Store applications will not be deployed to the system and may not function correctly.
The AppX Deployment Service (AppXSVC) provides the infrastructure support for deploying Store applications. This service starts on demand. If it is disabled, Store applications will not be deployed to the system and may not function correctly.
The Client Licensing Service (ClipSVC) provides support for the Microsoft Store infrastructure. This service starts on demand. If it is disabled, applications purchased through the Windows Store will not function correctly.
Conclusion
The AppX deployment service is an important process for the operation of Store apps, but it can sometimes cause high CPU usage and slow down your PC. This can be due to a conflict with the .NET Runtime Optimization Service , which optimizes the performance of .NET applications in the background.
We hope this article was helpful and that you were able to fix the high CPU usage issue with the AppX deployment service. If you have any questions or comments, please leave them below.
 to use the Ping command in Windows ?")

