

Wake -on-LAN (WoL) is a feature that allows you to remotely turn on your PC by sending a network signal called a " magic packet ." This can be useful if you want to access your PC from another device, for example, to use remote desktop software, or if you want to control your PC with voice commands via Google Assistant or Alexa.
To use Wake-on-LAN, you need a PC connected to a router via an Ethernet cable , and a motherboard and network card compatible with this feature. Most modern motherboards and network cards are, but you can check in the Windows 10 Device Manager or in your PC's BIOS.
In this article, we will explain how to enable Wake On Lan on Windows 10 in a few simple steps.
Step 1: Enable Wake On LAN on the network card
The first step is to Windows 10 settings . To do this, follow these instructions:
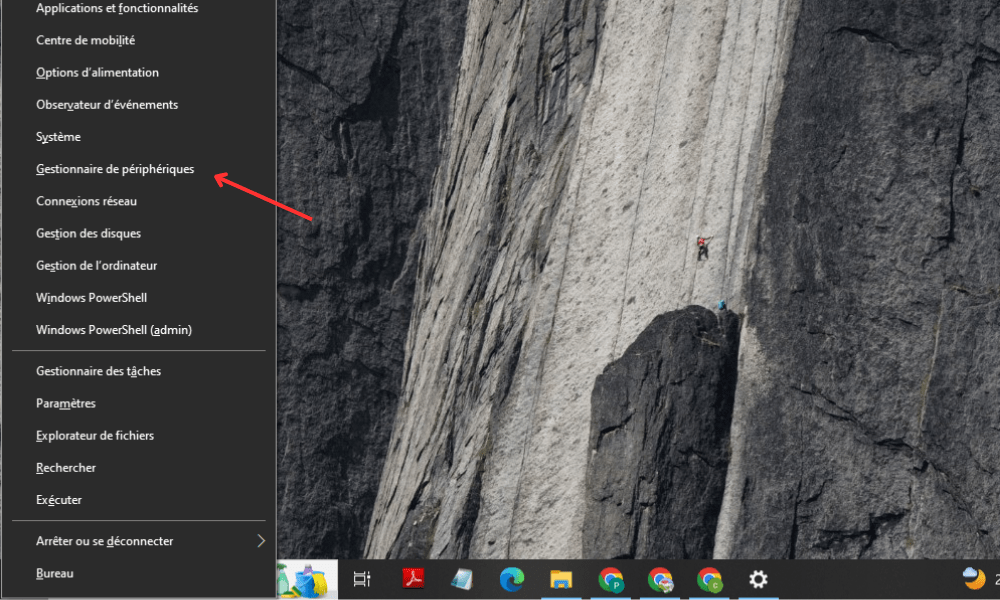
- Right-click the Start and choose Device Manager .
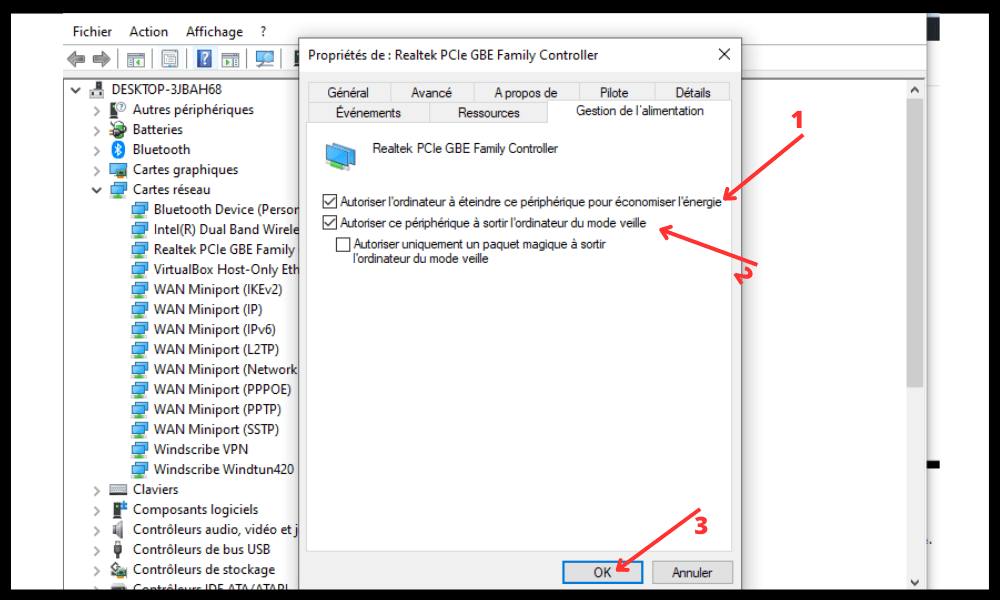
- Network adapters category and right-click on the network adapter you use to connect to the router.
- Select Properties and go to the power supply Management .

- Check the box Allow this device to wake this computer from sleep mode .
- Also check the box "Only allow a magic packet to wake this computer from sleep mode" .
- Click OK to confirm the changes.
Step 2: Disable fast start and power saving
The second step is to Windows 10 's Fast Startup and Power Saver modes , as these can prevent Wake-on-LAN from working correctly. To do this, follow these instructions:
- Right-click the Start and choose power supply options .

- Click on Additional system settings in the right pane .
- Click on Change settings for the current mode .
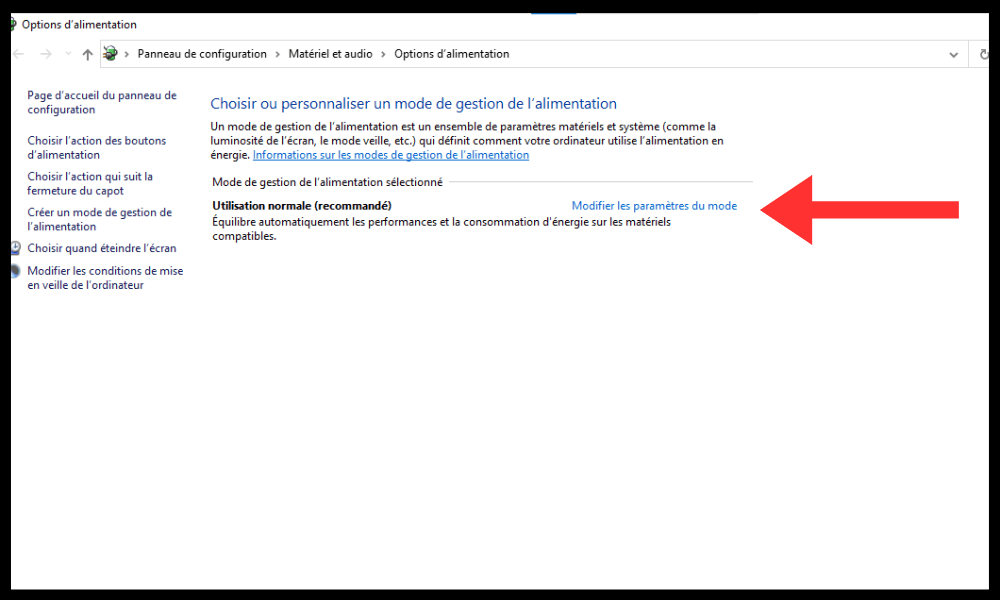
- Click on advanced power supply settings .
- Expand the power supply buttons and cover Enable fast start option .
- Expand the PCI Express Settings and disable the ASPM (Active State Power Management) Link .
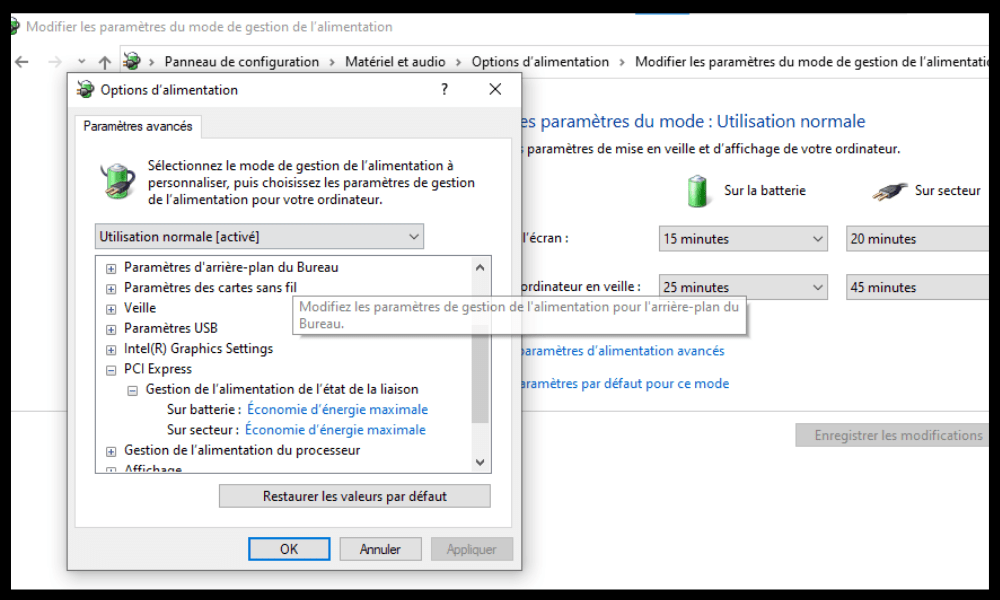
- Click OK to confirm the changes.
Step 3: Configure the BIOS
The third step is to configure your PC's BIOS to enable Wake-on-LAN . The BIOS is the software that manages your PC's basic settings before Windows loads. To access the BIOS, you need to restart your PC and press a specific key during startup. The key varies depending on the manufacturer, but it is usually displayed on the screen (for example, F2, F10, Delete, etc. ).
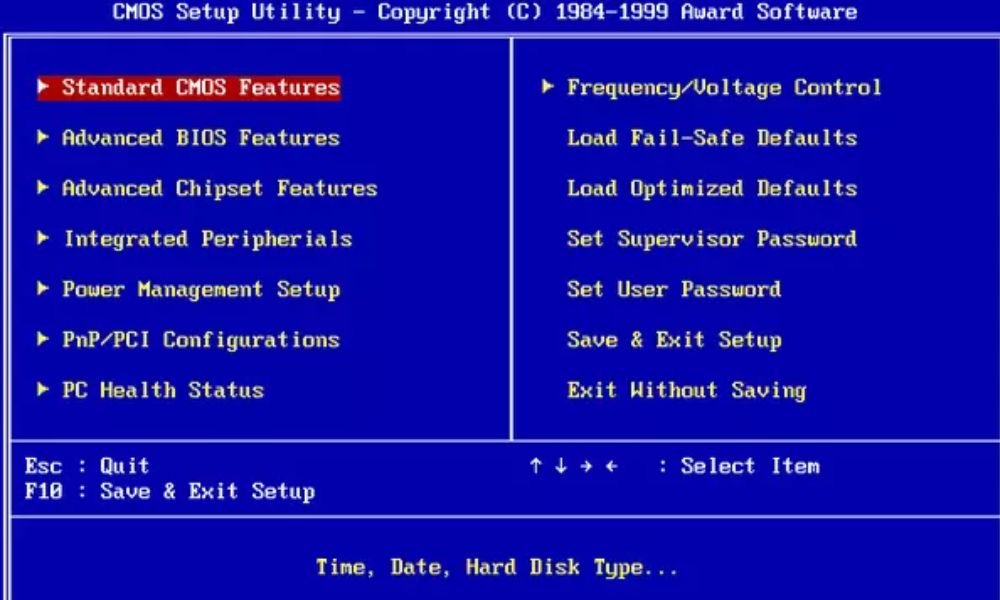
Once in the BIOS, you need to look for an option related to Wake On LAN. It may be located in different sections depending on the model, but it is often labeled “ Wake On LAN ”, “ Wake On PCI ”, “ Power On By PCI ”, or something similar. Enable this option and save the changes before exiting the BIOS.
Step 4: Send a magic packet to turn on your PC

The final step is to send a magic packet to remotely turn on your PC. The magic packet is a network signal that contains the MAC address of your network card. The MAC address is a unique identifier for your network card, which takes the form of a 12-digit string of numbers and letters separated by hyphens or colons (for example, 00-11-22-33-44-55 or 00:11:22:33:44:55 ).
To find your network adapter's MAC address, right-click the Start button and select Command Prompt. Then type the command ipconfig /all and locate the Physical Address line under your network adapter's section.
To send a magic packet, you need another device connected to the same network as your PC, such as a smartphone, tablet, or another PC. You also need to install an application or software capable of sending magic packets, such as Wake On Lan for Android , Wake On Lan for iOS , or WakeMeOnLan for Windows .
Once you have installed the application or software, you need to enter your network adapter's MAC address and your PC's IP address. The IP address is your PC's identifier on the network, and it takes the form of four numbers separated by periods ( for example, 192.168.1.10 ). You can find it using the same `ipconfig /all` command as before, and by locating the IPv4 Address line under your network adapter's section.
If you can't find your PC's IP address, you may have a network connection problem. In this case, you can try to resolve the "Server IP address could not be found" error message by following the steps outlined here.
After entering the MAC address and IP address , you can send the magic packet by pressing a button. If everything is configured correctly, your PC should turn on remotely.
FAQ
Here are some frequently asked questions about Wake On LAN on Windows 10:
Does Wake On LAN work over Wi-Fi?
Yes, Wake-on-LAN can work over Wi-Fi if your wireless network card is compatible with Wake-on-Wireless LAN (WoWLAN) . However, Wi-Fi is less reliable than Ethernet for sending "magic packets" because it can be affected by interference, range, or router settings.
Does Wake On LAN work over the Internet?
Yes, Wake-on-LAN can work over the internet if you know your router's public IP address and configure port forwarding on it. The public IP address is your router's identifier on the internet, which may be different from your PC's local IP address on the network. You can find it using a website like https://www.whatismyip.com/. Port forwarding is the process of redirecting data packets from your router's external port to your PC's internal port . You should consult your router's manual for instructions on how to do this.
Is Wake On LAN secure?
Wake-on-LAN is not very secure because there is no authentication or encryption of the magic packets . This means that someone who knows your PC's MAC and IP addresses could potentially turn it on remotely without your consent. To prevent this, you can restrict access to your network, use a VPN, or disable Wake-on-LAN when you don't need it.
Does Wake On Lan consume a lot of energy?
Wake-on-LAN consumes a small amount of power because it keeps the network card in standby mode even when the PC is turned off . However, this power consumption is negligible compared to the PC's power consumption when it's on. Wake-on-LAN can even save you energy if you use this feature to remotely shut down your PC when you don't need it.
Does Wake On LAN work with all computers?
Wake-on-LAN works with all computers that have an ATX-compatible motherboard and a WoL-compatible network card . Most modern computers meet these criteria, but there may be exceptions. For example, some laptops do not have an Ethernet port and do not support WoWLAN. Some computers may also have specific settings in the BIOS or Windows that prevent Wake-on-LAN from working correctly. Therefore, you should verify that everything is configured correctly before using this feature.
Conclusion
Wake -on-LAN is a feature that allows you to turn on your PC remotely by sending a network signal called a " magic packet ." This can be useful if you want to access your PC from another device, for example, to use remote desktop software, or if you want to control your PC with voice commands via Google Assistant or Alexa .
To use Wake-on-LAN, you need a PC connected to a router via an Ethernet cable, and a motherboard and network card compatible with this feature. You also need to enable Wake-on-LAN in your network card settings, power supply options , and your PC's BIOS . Finally, you need to send a "magic packet" from another device using a dedicated application or software.
Wake -on-LAN is not without its drawbacks . It consumes a small amount of power , it's not very secure, and it may not work with all computers. Therefore, you should weigh the pros and cons before using it.
We hope this article has helped you understand how to enable Wake-on-LAN on Windows 10 and take advantage of its benefits. If you have any questions or comments, please let us know in the section below.
 to use the Ping command in Windows ?")

