

To disseminate important information clearly and concisely, creating a flyer in Microsoft Word can be very advantageous. Unfortunately, you don't know how to create one effectively? Have you already tried a few online tutorials without much success? Don't panic! We're here to help. In this article, we'll show you step by step how to create an excellent flyer using Microsoft Word.
There are several reasons why you might want to create a flyer in Word. First, it's a widely available and easy-to-use word processing program, making it a logical choice for creating simple documents like flyers. Second, Word offers a great deal of flexibility when it comes to formatting and customizing your document, allowing you to create a flyer that perfectly matches your needs and brand image.
There are several reasons why someone might want to create a flyer:
- Promote events
- Encourage product purchases
- Gathering a large number of prospects, etc.
Its most common formats are A5 and A4 . It can also be printed on one or two sides.
Creating a flyer in Word: How to do it right?
Now that you know more about flyers, let's see how to create one quickly and efficiently without any hassle. This video might be helpful:
Still not satisfied? Follow these steps to better create your leaflet .
This article might interest you: Ctrl + Z: What is the purpose of this surprising keyboard shortcut?
Create a flyer in Word using existing templates
In Microsoft Word, you'll find a wide range of ready-to-use templates to help you create and personalize flyers. Follow these steps to speed things up:
Step 1: Access Word's flyer templates
To access Word's flyer templates, first open the program and click on "File" then "New." You will then see a list of different document templates, among which you should find several flyer templates. You can browse these templates to find the one that best suits your needs, then click "Create" to open the selected template.

Step 2: Customize the selected template
Once you've opened your chosen flyer template, you can begin customizing it by editing the text and adding your own images and logos. To edit the text, simply click on it and type directly into Word. To add images, click "Insert," then "Illustration," and select the image you want from your computer.

Step 3: Adjust the layout
The layout of your flyer is very important, as it determines how your document will be presented to readers. To adjust the layout of your flyer, use Word's layout tools, such as margins, columns, and alignment. You can also use text formatting tools, such as fonts and sizes, to emphasize certain elements of your flyer.
To edit the text:
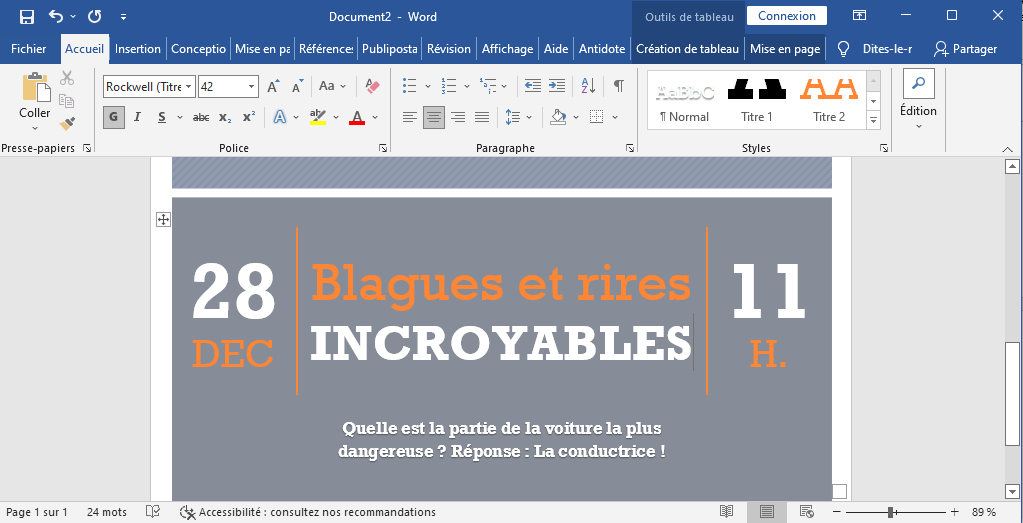
Instead of leaving the default Word-generated message, you can modify it by simply replacing it with your own text. For example: " What's the most dangerous part of a car? Answer: The driver! " 😂 (see image)
To change the image:
Right-click on the image powered by Word and select " Change Picture ." Alternatively, select the image and then delete it. Then, find and click the " Insert " tab at the top of the page and click " Picture ."
To change the color and other design elements:
Right-click on the area you want to modify and choose the appropriate menu item. If you want to delete an unwanted item, select it all and press the " Delete " key on your keyboard.

Have you just finished your leaflet? Perfect! The first thing to do is save it so you don't lose your work in case there's a bug on your computer.

Step 4: Save and print the flyer
Once you've finished creating your flyer in Word, all you have to do is save and print it. To save your flyer, click on "File" then "Save As" and choose the location where you want to save your document. Don't forget to give your flyer a meaningful name so you can easily find it later.
To print your flyer, click on "File" then "Print" and follow the on-screen instructions. Be sure to check the print settings before printing to ensure the flyer prints as desired.

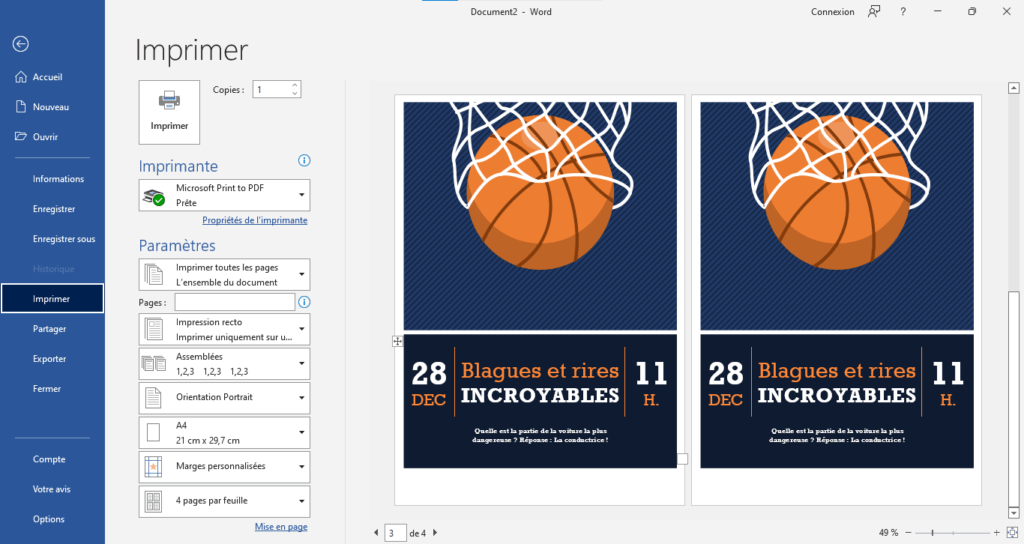
Tip: To avoid spending all day printing, you can create two flyer pages simultaneously and have your printer print multiple pages . First, use the keyboard shortcut Ctrl + Enter to duplicate the page. In the " Settings " section of the " Print "2 per sheet option instead of " 1 per sheet " and click " Print ".
Creating a flyer from scratch in Word:
If you can't find a flyer template that suits your needs, you can also create a flyer from scratch in Word. Here's how:
Step 1: Open a blank document in Word
To create a flyer from scratch in Word, start by opening the program and clicking on "File" then "New". Select "Blank document" and then click "Create". You will then see a blank page on which you can begin creating your flyer.
Step 2: Use the drawing tools to add shapes and lines
To add shapes and lines to your flyer, use Word's drawing tools. To do this, click "Insert," then "Draw," and select the tool you want from the toolbar that appears. You can use these tools to draw lines, squares, circles, and more on your flyer.
Step 3: Use the "Text" tool to add text to the flyer
To add text to your flyer, use Word's "Type" tool. To do this, click "Insert," then "Type," and select "Text Box" from the list of options that appears. A text box will then appear on your flyer, where you can enter your text.
Step 4: Personalize the flyer with images and colors
To bring your flyer to life, feel free to add images and play with colors. You can use Word's "Insert" and "Format" tools to add..
You can add images and customize the colors of your flyer. For example, you can add your logo or images that illustrate your business or product, and use different colors to highlight certain elements of your flyer.
Step 5: Adjust the layout
To adjust the layout of your flyer, use Word's formatting tools, such as margins, columns, and alignment. Remember that layout is crucial for your flyer's readability, so take the time to plan it carefully.
Step 6: Save and print the flyer
Once you have finished creating your flyer in Word, all you have to do is save and print it. Follow the steps described above to save and print your flyer.
Tips for creating a successful flyer in Word:
Here are some tips to help you create a successful flyer in Word:
- Plan the content and layout before you start creating: Before you begin designing your flyer, take the time to think about what you want to include and how you're going to present it. This will help you avoid wasting time and ensure your flyer is effective.
- Highlight important information with images and colors: To capture your readers' attention, emphasize the most important information in your flyer with images and colors. Use Word's formatting tools to highlight specific elements of your flyer.
- Keep the layout simple and easy to read: To ensure your flyer is legible and easy to understand, avoid cluttering the layout. Use headings and subheadings to structure your content and leave enough white space for your readers to breathe.
- Check spelling and grammar before printing your flyer: Before printing your flyer, be sure to check the spelling and grammar of your content. A flyer containing errors can be perceived as unprofessional and damage your credibility.
Creating your flyer online: alternatives to Word?

If you're not getting the results you wanted with Microsoft Word, we'd like to inform you that there are websites that allow you to create a flyer for free in just a few clicks. Canva and Adobe are two easy-to-use graphic design tools that can meet all your needs. Both sites offer numerous attractive and user-friendly flyer templates that you can easily customize to your liking.
Conclusion :
By following the steps and tips described above, you should be able to create a high-quality flyer in Word that meets your needs and effectively promotes your business, event, or product. Remember that the key to a successful flyer is carefully planning its content and layout, highlighting important information, and ensuring the document is legible and professional. With a little time and effort, you should be able to create a Word flyer that will make a strong impression on your readers.


