

Have you turned on your computer only to find yourself facing a " out of range message ? Don't panic, this is a common problem that can be easily solved. In this article, we'll explain the causes of this issue and provide you with 7 effective solutions to fix it.
What is the “out of range” error?

out of range error means that resolution or refresh rate is too high for your monitor to support. Resolution refers to the number of pixels displayed on the screen, while the refresh rate refers to the number of times per second the image is updated.
If the resolution or refresh rate is too high, the monitor cannot display the image correctly and shows a black screen with an " out of range " message. This problem can occur when you change your graphics card, when you connect your computer to another screen, or when you change the display settings in Windows or a game.
How to resolve the “out of range” error?
There are several solutions to resolve the "out of range" error. Here are the 7 most effective solutions:
Solution 1: Change the display settings
The first solution is to Windows display settings to reduce the resolution or refresh rate of your screen. To do this, you need to start your computer in safe mode , which is a diagnostic mode that allows you to start Windows with minimal settings .
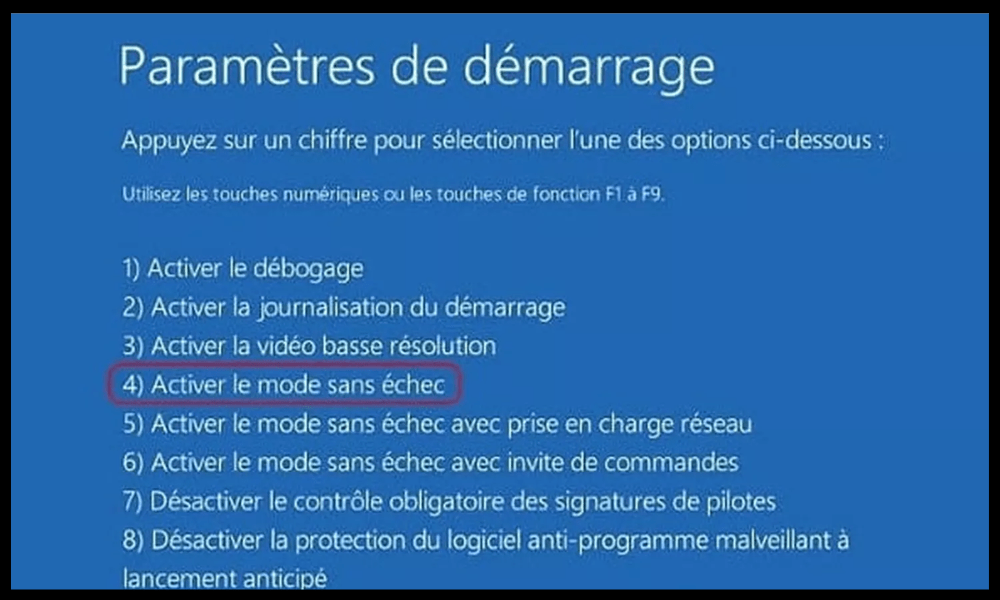
To start in safe mode , follow these steps:
- Restart your computer and press the F8 key several times before the Windows logo appears.
- In the menu that appears, select “ Safe Mode ” using the arrow keys and press Enter.
- Once Windows has started in safe mode, right-click on the desktop and click on “Properties”.
- In the window that opens, go to the “ Settings ” tab and reduce your screen's resolution or refresh rate. For example, you can choose a resolution of 1024 x 768 pixels and a refresh rate of 60 Hz.
- Click on “Apply” and then on “OK” to confirm the changes.
- Restart your computer normally and check if the problem is resolved.
Solution 2: Use safe mode

If you cannot access Safe Mode using the F8 key , you can use another method to access it. To do so, follow these steps:
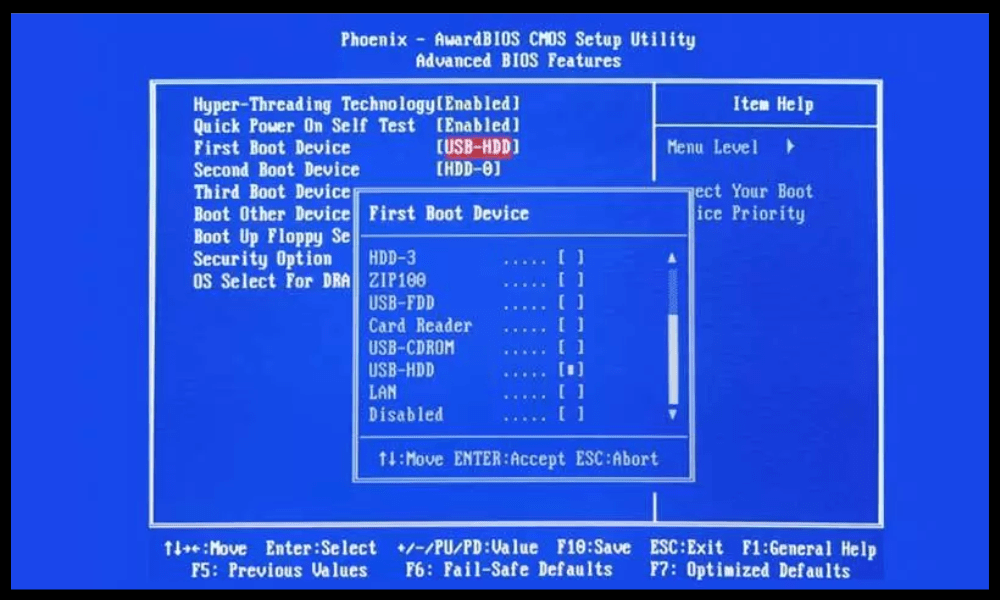
- Restart your computer and press the Delete or Del key several times to access the BIOS (Basic Input Output System), which is the program that manages your computer's basic settings.
- In the BIOS, look for the “Boot Menu” or “Boot Order” option and change the boot order so that the CD/DVD drive is first.
- Insert the Windows installation disc into the CD/DVD drive and restart your computer.
- When the message "Press any key to boot from CD or DVD" appears, press any key to launch the WindowsSetup program.
- In the first window that opens, click on “ Repair your computer ” in the bottom left corner.
- In the next window, select the operating system you want to repair and click “Next”.
- In the “ System Recovery Options ” window, click on “Command Prompt”.
- In the black window that opens, type the command “bcdedit /set {default} safeboot minimal” and press Enter. This command will configure Windows to boot into Safe Mode on the next restart.
- Type the command “exit” and press Enter to close the command prompt.
- Restart your computer and let it boot into safe mode.
- Once Windows has started in safe mode, follow the same steps as in solution 1 to change your screen display settings.
- To disable safe mode on the next reboot, open the command prompt again and type the command “bcdedit /deletevalue {default} safeboot” and press Enter.
- Restart your computer normally and check if the problem is resolved.
Solution 3: Individual Applications
If the problem only occurs when you launch a specific application , such as a game or graphics software, you can try changing that application's display settings. To do this, you need to access the application's configuration file, which is usually located in the installation folder or in the "My Documents" folder.
For example, if you have a problem with Darksiders Warmastered Edition, you need to delete the “options.dopt” file located in the folder “C:\Users\Username\Documents\My Games\Darksiders\Warmastered”. This file contains the game's display settings, which will be reset the next time you launch the game.
To change the display settings of an application, follow these steps:
- Locate the application configuration file and open it with a text editor such as Notepad.
- Look for lines containing the words “resolution” or “refresh rate” and change the values to match those your screen can support. For example, you can replace “1920×1080@75” with “1024×768@60”.
- Save the file and close it.
- Launch the application and check if the problem is resolved.
Solution 4: Device Driver
Another possible cause of the “out of range” error is an outdated or corrupted device driver. A device driver is software that allows your operating system to communicate with your graphics card or monitor. If the driver is outdated or malfunctioning, it can cause display problems.
To update or reinstall the device driver, follow these steps:
- Start your computer in safe mode ( see solution 1 or 2 ).
- Right-click the Start button and click “Device Manager”.
- In the window that opens, expand the “Graphics cards” category and right-click on your graphics card. Click on “ Update driver” .
- In the next window, click “Search automatically for updated driver software”. Windows will search the internet for the latest driver for your graphics card and install it if necessary.
If Windows cannot find an updated driver, you can try reinstalling the current driver. To do this, right-click on your graphics card and click "Uninstall device." Confirm the uninstallation and restart your computer. Windows will detect your graphics card and reinstall the driver automatically.
You can also download the latest driver for your graphics card from the manufacturer's website (Nvidia, AMD, Intel, etc.) and install it manually. Follow the manufacturer's instructions to install the driver correctly.
Do the same for your monitor driver, which is located in the “Monitors” category of Device Manager. Update or reinstall your monitor driver using the same method as for the graphics card.
Restart your computer normally and check if the problem is resolved.
Solution 5: Disable sleep mode

Another possible cause of the “out of range” error is your computer's sleep mode. Sleep mode is a function that allows your computer to pause its activity to conserve power . When you wake your computer from sleep mode, your screen may not recognize your computer's display settings and may display a black screen with an “out of range” message.
To avoid this problem, you can disable sleep mode or change your computer's power supply settings. To do this, follow these steps:
- Right-click the Start button and click “ power supply options”.

- Click on “Additional power supply settings” located in the right sidebar

- In the window that opens, press “Change mode settings” next to the mode you are using (balanced, power saving…).

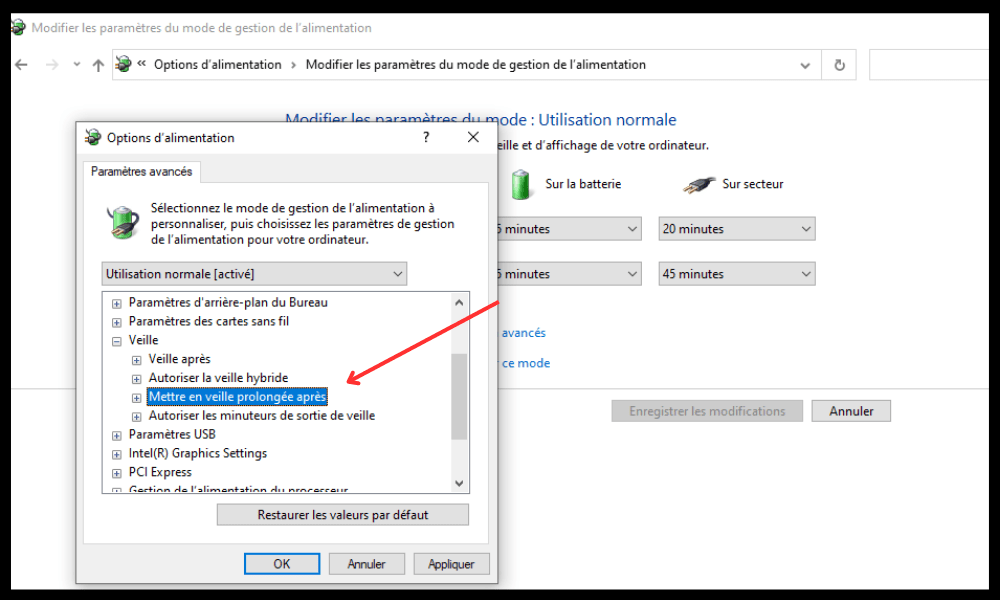
- Click on “Edit advanced power supply settings”.

- In the next window, expand the “Sleep” category and click “Hibernate after.” Change the time after which your computer goes to sleep when you are not using it. Choose the “Never” option to disable sleep mode.
- Click “OK” to confirm the changes.
- Restart your computer and check if the problem is resolved.
Solution 6: Reset the BIOS

Another possible cause of the "out of range" error is a problem with the BIOS (Basic Input Output System), which is the program that manages your computer's basic settings. If the BIOS is misconfigured or corrupted, it can cause display problems.
To resolve this issue, you can reset the BIOS to its default settings. To do so, follow these steps:
- Restart your computer and press the Delete or Del key several times to access the BIOS.
- In the BIOS, look for the “Load Optimized Defaults” or “Load Setup Defaults” option and select it using the arrow keys. Press Enter to confirm.
- Press F10 to save the changes and exit the BIOS.
- Restart your computer and check if the problem is resolved.
Solution 7: Change monitor

If none of the previous solutions work, your monitor may be faulty or incompatible with your graphics card. In this case, you can try a different monitor and connect your computer to another screen that supports the resolution and refresh rate you want to use. This will help you determine whether your graphics card is dead or if the problem lies with the monitor.
To change your monitor, follow these steps:
- Turn off your computer and unplug the cable that connects your monitor to your graphics card. This could be a VGA, DVI, HDMI, or DisplayPort , depending on the type of connection you are using.
- Connect the new monitor to your graphics card using the same type of cable or an adapter if necessary.
- Turn on the new monitor and adjust the resolution and refresh rate according to the manufacturer's specifications. You can consult the monitor's manual or the manufacturer's website for optimal settings.
- Turn on your computer and check if the problem is resolved.
FAQ
out of range ” error
What is the difference between resolution and refresh rate?
Resolution refers to the number of pixels displayed on the screen, while the refresh rate refers to the number of times per second the image is updated. The higher the resolution, the sharper and more detailed the image. The higher the refresh rate, the smoother and more fluid the image.
How can I find out the maximum resolution and refresh rate my screen can support?
You can consult your monitor's manual or the manufacturer's website for technical specifications . You can also right-click on the desktop and select "Properties." In the window that opens, go to the "Settings" tab and click "Advanced." In the next window, go to the "Display" tab and check the box "Hide modes that this monitor cannot display." You will then see the available resolutions and refresh rates for your screen.
What is the best resolution and refresh rate for my monitor?
The best resolution and refresh rate for your monitor depend on your personal preferences and how you use your computer. Generally, it's advisable to use your monitor's native resolution, which corresponds to the actual number of pixels it has. For example, if your monitor has a native resolution of 1920 x 1080 pixels, it's best to use that resolution rather than a lower or higher one.
The best refresh rate for your monitor also depends on the type of activity you perform on your computer. If you use your computer for simple tasks like web browsing or word processing, a 60Hz refresh rate may be sufficient. If you use your computer for more demanding activities like gaming or video editing, a higher refresh rate such as 75Hz, 120Hz, or 144Hz may be more suitable. A higher refresh rate provides a smoother and more responsive image, but it also consumes more power and may require a more powerful graphics card.
How do I change the resolution and refresh rate of my screen in Windows ?

To change your screen resolution and refresh rate in Windows , follow these steps:
- Right-click on the desktop and click on “Properties”.
- In the window that opens, go to the “Settings” tab and adjust the slider under “Screen resolution” to choose the resolution you want to use. You can also click the “Advanced” button to access more options.
- In the next window, go to the “Screen” tab and choose the refresh rate you want to use from the drop-down menu under “Monitor Refresh Rate”. You can also check the “Hide modes this monitor cannot display” box to only see the refresh rates compatible with your screen.
- Click on “Apply” and then on “OK” to confirm the changes.
Conclusion
The "out of range" error is a display issue that can be easily resolved by adjusting your monitor or graphics card display settings. We've provided seven effective solutions to fix this problem and allow you to fully enjoy your computer. If you still have questions or difficulties, please don't hesitate to contact us or consult a professional. We hope this article has been helpful and that you've learned something new.


